![[Help Contents]](mshelptopic.gif)

![[MicroSpell Home Page]](text4.gif)
|
Figures: |
Outbox Highlights
 What is the Outbox?
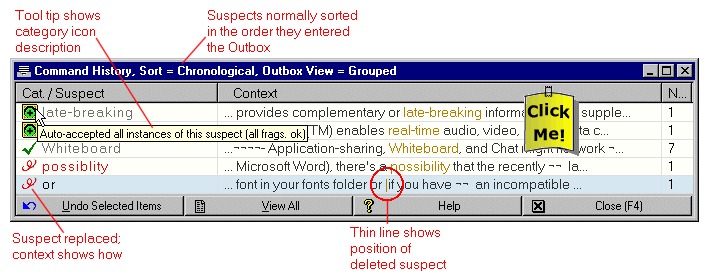
The Outbox is where the speller keeps a history of how you handled every Inbox or Spell Check dialog suspect. You can use it to see what MicroSpell has auto-accepted or auto-corrected, to confirm your corrections, to undo any of these actions, and to augment user dictionaries. The Outbox is optional in the sense that you can check and correct your documents without using it. Closely associated with the Inbox, it is automatically closed when the Inbox closes and can only be opened when the Inbox is open. The Outbox looks like the Inbox except that the suspect category icons are different (at least, by default) and there is only a single row of command buttons at the bottom. You can display the Outbox by using the Show|Outbox command on the Inbox pop-up menu or the View|Outbox/Inbox Alternate command from the main edit window. You can close and reopen the Outbox at will without any side effects.
Category Icons and Suspect Coloring
Suspect coloring in the Outbox is simpler than in the Inbox. The coloring shows whether a suspect (in its entirety) is known, and if so, whether it is temporarily or permanently known. Each suspect is drawn using a single color, and there are only three possibilities: "unknown" (red, by default), "known" (word is in main or user dictionary—black, by default), and "temporarily known" (word is on temporary "Accept All" list—grey, by default). "Known" and "unknown" refer to the entire suspect, not individual parts. Thus, a suspect can be colored "unknown" even though it is composed of fragments, all of which are known.
The suspect category icons used in the Outbox show which Inbox or Spell Check dialog command handled the suspect. They are the same icons as on the corresponding command buttons, augmented with the Auto-Correct/Auto-Accept icons which look like red and green traffic signals. These originate with the Auto-Accept and Auto-Correct functions which are controlled from the main window Options|General Preferences|Spell Checking dialog.
Here are the suspect category icons and their meanings (if you forget the meaning of a icon while using MicroSpell, rest your cursor on it and you will see a pop-up tool tip that describes the icon):
-

- MicroSpell has automatically corrected the suspect; the context column shows the result. This category icon is used for all auto-corrections: capitalization-related, as well as those arising from the temporary Replace All list and user auto-correction dictionaries. MicroSpell performs auto-corrections after auto-accepts. Thus, when the Outbox is first displayed, these icons (if present) will appear at the end of the list so you can readily verify them.
-

- MicroSpell auto-accepted this suspect because all word fragments matched known words. It has been added to the Accept All list.
-

- MicroSpell auto-accepted this suspect because it is likely to be a URL, an E-mail address, or a computer file name. It has been added to the Accept All list.
-

- MicroSpell auto-accepted this suspect because it is all upper case. It has been added to the Accept All list.
-

- MicroSpell auto-accepted this suspect because it is a number, number-like, or contains numbers. It has been added to the Accept All list.
-

- MicroSpell auto-accepted this suspect because you gave an Accept All - Newly Recognized command or the word was found in a dictionary having the "uncommon" property. It has been added to the Accept All list.
-

- You gave an Accept All command for this suspect. It has been added to the Accept All list.
-

- You gave an Allow Once command for this suspect. It has not been added to the Accept All list.
-

- You have replaced or deleted all instances of this suspect. The context column shows the result. The suspect and correction have been added to the Replace All list as a temporary auto-correction.
-

- You have replaced or deleted one instance of this suspect. The context column shows the result. The speller has not added an auto-correction entry to the Replace All list.
-

- You have saved this suspect in a user dictionary. The tooltip associated with the category icon tells which one. The word has also been added to the temporary Accept All list.
-

- You have saved this suspect (after converting to lower case) in a user dictionary. The tooltip associated with the category icon tells which one. The word has also been added (as is) to the temporary Accept All list.
Command Buttons
As you can see in the figure above,
the Outbox has a row of buttons along the bottom that perform
common operations. You can either
click the button to perform any of the operations, or press the
shortcut key that is underlined in the button text. Because some of
these commands are used so frequently, you do not have to press the
<Alt> key along with the letter key as you must in some other dialogs.
Here is a brief description of
each of the button commands:
- Undo button
- This command enables you to undo any Inbox or Spell Check dialog command that caused a suspect to leave the Inbox or Spell Check dialog and go to the Outbox, including all side effects such as document changes and saves to a user dictionary. You can select any suspect, or set of suspects, and undo the command(s) that brought it (them) to the Outbox. In particular, to undo a given command, you do not have to undo all of the commands that followed it. By default, the last suspects to enter the Outbox are selected so you can undo your last command by simply pressing the Undo button (or use <Ctrl-Z> or <Alt-U> from either the Inbox or the Outbox). When you bring a group of suspects back to the Inbox via Undo, they are selected so you can examine them or perform another operation that affects the entire group.
- View First Only/View All button
- This command toggles between a "first only" and a full display of the suspects. When the suspects are viewed "first only," each line of the Outbox represents all of the instances of the suspect shown. The context is shown for only one of the suspects. When you view all of the suspects, the Outbox typically has many more lines because every instance of every suspect is displayed. The third column of the Outbox is not displayed in this view because all of the entries would be "1". The full view is useful when you've replaced or deleted multiple instances of a suspect and want to see the results in context for all of them. However, if there are only a few instances of a particular suspect, you might prefer to step through them by repeatedly double-clicking the suspect context.
- Help button
- This command displays context help for any of the Outbox icons or buttons. Click this button, then click the Outbox item on which you want help.
- Close (F4) button
-
This command closes the Outbox. The contents of the Outbox are preserved
until you close the Inbox. Therefore, you can reopen the Outbox at any
time by using the View|Outbox/Inbox Alternate command in the main
window or by using the Inbox command
Show|Outbox . You will seldom have to close the Outbox, because closing the Inbox automatically closes the Outbox as well.
Mouse Shortcuts and Tool Tips
All of the Inbox mouse shortcuts and tool tips are available in the Outbox, except for the following. Double-clicking a blank area in the suspect column does nothing. Double-clicking the suspect invokes the Lookup dialog which is a modified version of the Inbox Replace dialog.
Pop-Up Menu Commands
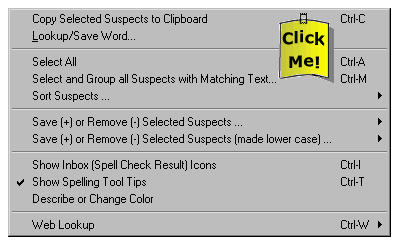
There are too many Outbox commands to assign a button for each one. Instead, all commands without an associated button are available on a pop-up menu. You can invoke this menu by right clicking anywhere on the Outbox, or by using the keyboard shortcut <Shift-F10>. Many of the pop-up menu commands have their own keyboard shortcuts (shown near the right edge of the menu) which enable you to issue the commands without displaying the menu.
When MicroSpell is displaying this menu, you can get help on any
command by highlighting it and pressing <F1>. Here are the commands with brief descriptions listed in the order in which they appear
on the menu (you can click the menu graphic to scroll to any command):
- Copy Selected Suspects to Clipboard
- Copies one or more suspects to the Clipboard, one word per line. This is the proper format for pasting into any user dictionary if you prefer to use copy-and-paste rather than drag-and-drop.
- Select All
- Select all Outbox suspects.
- Lookup/Save Word
- Invokes the Lookup dialog for the selected suspect. From there, you can save the suspect, an edited version of the suspect, or any other word in any user dictionary. You can also remove the suspect form a user dictionary or look up any word then jump to it in the dictionary View/Edit dialog.
- Select and Group all Suspects with Matching Text
- This command enables you to find all suspects that have certain characters in common, which in turn lets you take advantage of MicroSpell's ability to operate on an entire group of suspects at once to save time. It presents a dialog box where you can type a text string that you want to search for. MicroSpell will select all suspects that contain the string and move them to the top on the Outbox. You can control whether a successful match must encompass the entire suspect or just part of it, and whether the match must be exact, including case. If the currently selected suspect (before you issue this command) contains any non-alphanumeric characters, the first one encountered becomes the default search string. This makes it easy to find all instances of certain suspects. For example, to find all abbreviations, you could select any one of them, then type <Ctrl-M> (the keyboard shortcut) followed by <Enter> to select and group all of them.
- Sort Suspects
- The following commands mostly
duplicate what you can do with the sort buttons at the top of the
Outbox. However, there are two ways of sorting provided here that are
not available via the buttons: "Alphabetically," and "Alphabetically,
Ignoring Case." A check mark shows the current sort mode.
- Alphabetically (ABC...abc...)
- Sort suspects alphabetically taking case into account and ignoring the category icons. This command is not available via the sort buttons.
- Alphabetically, Ignoring Case (AaA...Bbb...cCc...)
- Sort suspects alphabetically ignoring case and the category icons. This command is not available via the sort buttons.
- By Category Icon + Alphabetically (ABC..Z...abc..z)
- Group suspects by category icon, then sort each group alphabetically paying attention to case. This command is also available on the suspect column sort button.
- By Category Icon + Alphabetically (AaA...Bbb...cCc...)
- Group suspects by category icon, then sort each group alphabetically ignoring case. This command is also available on the suspect column sort button.
- By Position in Document
- Order the suspects by their position in the document. If you are viewing the Outbox with suspects viewed "first only" (the normal way to view it), a suspect that occurs more than once in the document will be sorted according to the document position of the currently visible instance. This command is also available on the context column button.
- By Position in Document (Reverse)
- Sort like the previous command, only backwards. This command is also available on the context column button.
- Chronologically (Check/Correction Order)
- Sort suspects in the order in which they entered the Outbox. The Outbox reverts to this ordering whenever you add suspects so the most recent entries will always appear highlighted at the end until you re-sort. This command is also available on the context column button.
- By Suspect Frequency
- Sort suspects by the number of times they occur in the document (i.e., by the values in the number column). This command is also available on the number column button.
- Save (+) or Remove (-) Selected Suspects
- This command saves (or removes) the selected
suspects to (from) the user dictionary that you specify on its pop-up
menu. (When saving, it works like the Inbox Save To buttons, but it
is not limited to a preset dictionary.) If a plus sign precedes the
dictionary file name on the pop-up menu, the selected words will be
saved there. If there is a minus sign (along with the dele icon
for emphasis), the selected words will
be removed form the indicated dictionary. There is no harm in attempting
to add words that are already present, or remove words that aren't—these
words are ignored. A particular dictionary is marked as a "save" or
"remove" destination depending on whether the first selected word
is found there. For efficiency reasons, only open dictionaries can
be marked as "remove" destinations; you can save to any user dictionary
regardless of whether it is open or closed. Currently, this menu shows up to ten user dictionaries; if
you have more than this, some of them won't appear.
- Save (+) or Remove (-) Selected Suspects (made lower case)
- This command converts the selected suspects to lower case then behaves like the previous command. This is appropriate whenever a suspect is capitalized (as at the start of a sentence), but it does not have to be capitalized to be considered correct. Specifically, if word you save is all lower case, then it will match any reasonable capitalization, where "reasonable capitalization" means all lower case, initial letter capitalized, or all upper case. Currently, this menu shows up to ten user dictionaries; if you have more than this, some of them won't appear.
- Remove Selected Auto-Correction
- This command enables you to easily remove an entry from the auto-correction dictionary. You'll find this useful if you unintentionally make an auto-correction as a side-effect of a Replace All command. This option is disabled unless you have selected a single Outbox line and there is an auto-correction entry in the current default auto-correction dictionary for that word.
- Show Inbox (Spell Check Result) Icons
- This command causes MicroSpell to replace the normal Outbox category icons with those that were associated with the suspects in the Inbox. This is sometimes useful for checking your work after you're corrected a large number of suspects. For example, you can use it to see whether every repeated word and known misspelling has been fixed.
- Show Spelling Tool Tips
- Determines whether the pop-up tool tips that give icon descriptions and spelling help are shown.
- Show Tool Tip Help for Buttons
- Determines whether the pop-up tool tips that give button help are shown.
- Colors - Describe or Change
- This command invokes the Set Colors dialog initialized to show and describe the color under the cursor where the right-click occurred. This is a good way to find the meaning of any of the Outbox colors and, optionally, change it to suit your preferences. Changing colors using this command is easier than opening the Set Colors dialog from the main window Options menu because MicroSpell picks the item you right clicked on.
- Web Lookup
- This command looks up the selected word using the Internet web site chosen from the menu. The results appear in your browser. For more information, see How to Look Up Definitions, Synonyms, and Spellings Via the Internet.
Changing Things
You can customize the Outbox size, position, colors, and column widths while you are working and your settings are remembered after you close it. You can change the font using the main window Options|Set Font|Outbox command.