![[Help Contents]](mshelptopic.gif)

![[MicroSpell Home Page]](text4.gif)
- Simple and Efficient Spell Checking
- How to Check Multiple Documents (and Navigate Among Them)
- How to Automatically Check a Linked Group of HTML or TeX Documents
- How to Deal with a Large Number of Suspects
- How to Check and Correct a Large Number of Files
- How to Check Text in Other Windows (WordPad, Web pages, E-mail, etc.)
- How to Check Text on the Clipboard
- How to Use the Replace/Lookup Dialog to Modify Dictionaries: Finding, Adding, and Removing Words
- How to Create a New Dictionary
- How to Look Up Definitions, Synonyms, and Spellings Via the Internet
- Some Simple But Useful Tips
- How to highlight words in the Inbox and Outbox
- How to stop a spell check without saving your document to disk
- How to conveniently arrange the speller's windows on your screen
- How to adjust your Inbox and Outbox column widths
- How to find the Outbox if it gets covered by the Inbox (or vice versa)
- How to make auto-corrections truly automatic
- How to save a word in any user dictionary from the Inbox or Outbox
- See Also: Tips and Techniques
 Simple and Efficient Spell Checking (Via the Inbox)
Using MicroSpell's Spell Check dialog, you can check your document one-word-at-a-time as in virtually all other spell checkers. While this is simple, it is not as efficient as it could be. We recommend you try the alternative outlined here, especially if your documents typically contain many suspect words.
Don't be overwhelmed by MicroSpell's many options and commands. We've set reasonable defaults for the options and you can ignore most of the commands until you need them. As the next few paragraphs show, all you really need to know is how to open your document, correct the misspellings, and press the Done button. (For additional details, you can read the Inbox topic.)
Here's how to spell check a document using the Inbox. This method is simple, yet arguably the best approach when the number of unrecognized words is small or moderate, say fewer than about 200. (If you have many hundreds or thousands of suspects, see How to Deal with a Large Number of Suspects for some advice.)

(1) Open your document using the standard Windows File|Open command or one the other methods and start the spell check by pressing the red "check" button if the speller hasn't started automatically. The Inbox and Outbox appear if there are any unrecognized words. The Inbox shows all of the unrecognized words (suspects) at once.
Note: if instead of the Inbox, you see MicroSpell's one-word-at-a-time Spell Check dialog, press the Show List button.
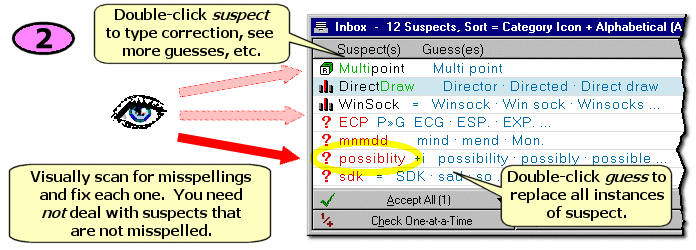
(2) Visually scan the list of unrecognized words in the Inbox to find the actual misspellings. The colors used to draw the words can help you decide whether a suspect merits closer scrutiny: known words or fragments are colored black or green, unknown words are colored red. Correct all of the misspellings as follows:
- Double-click on any of the guesses (or select a suspect and use the Replace All button) to replace all occurrences of the corresponding suspect with the guess.
- Double-click on any of the suspects (or select a suspect and use the Replace With button) if you want to replace it with a word that is not one of the guesses, or if you want to see more guesses.
- If you want to know what double-clicking elsewhere does, refer to this figure. If you'd rather use the keyboard, click the down-arrow on the Help button for shortcuts. For more information on what your are seeing in the Inbox, see this figure.
Tip: You can easily move down a page at a time by pressing the space bar. Use <Ctrl-Space> to move up by pages.
As you correct the misspellings, they leave the Inbox and appear in the Outbox where you can see your changes as they appear in your document. If necessary, you can use the Outbox Undo command to reverse any of your actions. (Just select one or more suspects in the Outbox and press Undo; the suspects will be returned to the Inbox and any associated changes to your document will be reversed.)
 |
Unlike other spell checkers, MicroSpell does
not require you to "Accept," "Ignore,"
"Save," or otherwise deal with any of the suspects that are not
misspellings. You can often save a lot of time by taking advantage of this.
As you become more familiar with the program, you'll learn when to use
these commands, plus the commands available
via the right mouse button pop-up menu in the Inbox and elsewhere within
MicroSpell.
When you decide to use one of these commands, here's another way to save time: select more than one suspect in the Inbox or Outbox (here's how) and apply the command to the entire group with a single keystroke or mouse click. |

(3) You're done after you correct your last misspelling. Press the Done button (even if there are still words in the Inbox) in the lower right area of the Inbox to close the Inbox and save your document. Note: you have to close the Inbox before you can open or check another document (this is why many of the main window commands are grayed out while the Inbox is open).
To check another document, just repeat these steps; also see How to Check Multiple Documents below.
| |
You might prefer to use the "+DSD" or the "+Accept" button instead of the "Done" button. These buttons work exactly like "Done" except that they first save the remaining suspect words so you won't see them later. The "+DSD" ("+LSD", when appropriate) button saves the words in a Document-Specific Dictionary so they will be considered correct next time you check the same document. The "+Accept" button merely saves the words until you exit from the speller. If you unintentionally press one of these buttons, here's how to undo the save. |
Optional: While you are visually checking words in the Inbox, if you see a correctly spelled word that the speller doesn't recognize and which you use frequently, you might want to save it in a user dictionary. New-words.DIC, which probably appears on one of the Save To buttons, is a reasonable place. Simply select the word (or words) you want to save and press the appropriate button. If the Dictionaries dialog is open, you can also drag-and-drop any selected word(s) on any user (light blue) dictionary.
Stopping a Spell Check: If you want to stop the spell check and close the
Inbox without saving
your file, you can (un)press the main window check  button (see
below for more information). In fact, for most spell checking
tasks, the button does everything you need: it starts, stops,
and restarts the speller as required.
button (see
below for more information). In fact, for most spell checking
tasks, the button does everything you need: it starts, stops,
and restarts the speller as required.
How to Check Multiple Documents (and Navigate Among Them)
To check a group of documents, you can simply repeat the steps outlined under Simple and Efficient Spell Checking. However, you'll probably find it more convenient to give all of the files you want to check at once at the beginning, and then have MicroSpell automatically open and check them one after another. Here's how:
| |
|
The first pane in the status bar displays a count of the number of files
that remain to be checked. You can obtain additional information using
the Document List dialog, which you can display by
double-clicking the first status bar pane or by using the  toolbar button.
You can interrupt spell checking at anytime ("unclick" the
toolbar button) and restart the same way (see step 2 above) or simply respond
to the Spell Check Interrupted dialog. If you
need to revisit a file that you have already checked, use the
Document List dialog toolbar button: select the file and press the Open button,
or just double-click on the file. You can then recheck this file by giving
any spell check command.
If you prefer not to open the file immediately, you can just clear the
checkbox next to the file name in the Document List dialog. The
speller will recheck the file while it is checking the remaining unchecked
files.
If you just want to advance to the next (or previous) unchecked file, the
Document List dialog might be overkill; you can do the same thing
more easily by using either the  or the
  toolbar button.
Tip: Don't worry about accidentally forgetting to check one of your documents. If you attempt to exit while there are any unchecked files, the speller will warn you and give you an opportunity to check them.
How to Automatically Check a Linked Group of HTML or
TeX Documents
MicroSpell can automatically add TeX files found in \include and \input commands in any file it is checking to the list of files to be checked. Similarly, it can add relative URLs found in anchor tags while checking HTML documents to the list of files to be checked. Each newly added file has the files to which it links added as well. Thus, by staring with the right file, you can check a large group of files without explicitly specifying them.
| |
To check all of your linked HTML or TeX files, just check the TeX "root" or HTML homepage. You should see a dialog like the one below. Press Yes to check everything. If this doesn't work, read the rest of this section. |
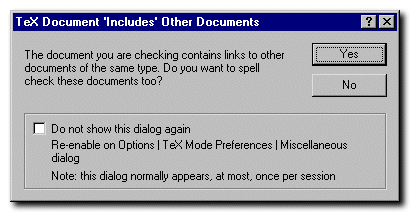 By default, the first time you check a TeX or HTML document that includes links to other
files, you'll see the dialog shown here. Press Yes or No as appropriate, and
MicroSpell will immediately begin checking your file(s).
By default, the first time you check a TeX or HTML document that includes links to other
files, you'll see the dialog shown here. Press Yes or No as appropriate, and
MicroSpell will immediately begin checking your file(s).
Note that this dialog will appear, at most, once each time you run MicroSpell, and the Yes/No response you give will apply throughout the current session. If you never want to see this dialog again, you can click the appropriate box to keep it from reappearing. If you want to change the setting after you've dismissed the dialog (or if you've "permanently" suppressed it) you can do so from the File menu or use the Options|TeX Mode Preferences|Miscellaneous or Options|HTML Mode Preferences|Miscellaneous dialog. You can also re-enable this dialog from there by setting the "Ask first" checkbox.
To check a group of linked TeX or HTML files:
- If you've suppressed the dialog discussed above, or you have already seen it since you started MicroSpell, and the speller is not currently set to check linked files (or you don't know), use the appropriate File menu command to change the setting, then proceed to the next step.
- Open the TeX "root" document or HTML home page which links to all of the files you want to check.
- Follow the instructions for How to Check Multiple Documents beginning with step 2.
How to Deal with a Large Number of Suspects
To check a document having hundreds or thousands of suspects, you
could proceed as described under Simple Spell
Checking, but you'll probably find it more efficient to use some of
MicroSpell's grouping and sorting commands to help pare down the
suspect list. (If you haven't familiarized yourself with
basic spell checking of small documents, it would be a good idea to
do this before working on a larger task.)
 The basic idea is that not all suspects are created equal. It is
easier to see that "SomethingLikeThis" has no misspellings than "Somethinglikethis". The grouping commands enable
you to bring together all suspects having a common property such as
being composed of several merged capitalized words; if this
property makes it easier to visually spell check them as in the
example above, you can quickly scan the group, deal with any problems,
then Accept or
Save the remaining members
of the group
nearly as easily as you would accept or save a single suspect.
You can then repeat these steps for any other appropriate groupings.
The basic idea is that not all suspects are created equal. It is
easier to see that "SomethingLikeThis" has no misspellings than "Somethinglikethis". The grouping commands enable
you to bring together all suspects having a common property such as
being composed of several merged capitalized words; if this
property makes it easier to visually spell check them as in the
example above, you can quickly scan the group, deal with any problems,
then Accept or
Save the remaining members
of the group
nearly as easily as you would accept or save a single suspect.
You can then repeat these steps for any other appropriate groupings.
The Accept All or Save To commands are an important part of the process because they remove the suspects from the Inbox. If all of the selected suspects are at the top—as they are when you press any of the Group buttons—then the Accept All From Current Selection to Top button does the same thing as Accept All and might be more convenient.
You might initially be reluctant to use grouping
functions if you have to correct some spellings within the group before
accepting the remaining items because in making the corrections, you deselect
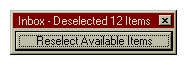 the group as a side-effect. To solve this problem, the speller automatically
displays a tiny dialog with a single "Reselect Available Items" button whenever
you collapse an Inbox group selection. Thus, you can group suspects,
make any necessary corrections within the group (the last member of
which is shown by a heavy grid line), then click the "Reselect Available Items" button
to restore the original selection.
the group as a side-effect. To solve this problem, the speller automatically
displays a tiny dialog with a single "Reselect Available Items" button whenever
you collapse an Inbox group selection. Thus, you can group suspects,
make any necessary corrections within the group (the last member of
which is shown by a heavy grid line), then click the "Reselect Available Items" button
to restore the original selection.
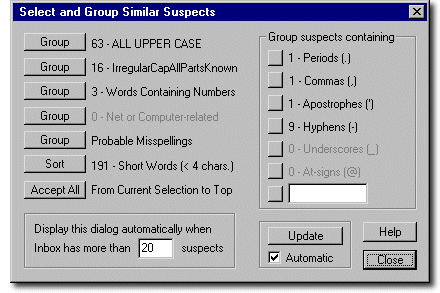
To make it easier to group suspects, MicroSpell automatically displays the Select and Group Similar Suspects dialog shown above whenever the Inbox contains more suspects than a preset threshold (shown at the lower left of the dialog). This dialog presents the same grouping commands that are available on the Inbox pop-up menu, but in a more convenient format. You can leave this dialog open and move between it and the Inbox by clicking or by using <Ctrl-Tab>. If this dialog hasn't opened automatically, you can view it any time using the Show | "Select and Group Similar Suspects" dialog on the Inbox right mouse button pop-up menu.
Instead of using the grouping commands or dialog as described above, you might find it easier
to group suspects by example as described next.

| |
Easy Grouping: If you typically view the Inbox suspects sorted in any way except by category
icon, then you can easily apply grouping commands by simply clicking the
grey square icon  next to any of the suspects. The
speller will automatically determine the category of the suspect whose
icon you clicked (short word, capitalized, upper case, etc.)
and select and group all similar suspects at the top of the list.
Thus, you
don't have to specify a category—just click an example of the words you want to
group. If the suspect whose icon you click is a member of more than one
category, you can continue to click the same icon to cycle through all
of the categories. (The suspect is moved to the top of the list so you
can easily locate it after the grouping operation.) The inbox title bar
shows the current grouping category, and you will see a message in a
self-closing dialog after you have reached the last category. next to any of the suspects. The
speller will automatically determine the category of the suspect whose
icon you clicked (short word, capitalized, upper case, etc.)
and select and group all similar suspects at the top of the list.
Thus, you
don't have to specify a category—just click an example of the words you want to
group. If the suspect whose icon you click is a member of more than one
category, you can continue to click the same icon to cycle through all
of the categories. (The suspect is moved to the top of the list so you
can easily locate it after the grouping operation.) The inbox title bar
shows the current grouping category, and you will see a message in a
self-closing dialog after you have reached the last category.
Note: if you don't see the grey square icons, click the Inbox "Context" sort button. |
Here are some things that often help pare down the Inbox list; the counts shown in the Select and Group Similar Suspects dialog suggest which of these will be productive:
- Use one or more of the grouping commands to group all upper case words, words containing numbers, words similar to our "SomethingLikeThis" example, and computer and net-related suspects such as file names and URLs. Many of these suspects are likely to be "noise" words.
- Select and group probable misspellings. While the collection of "probable misspellings" will typically include many more correct but unknown words than actual misspellings, it will also include most of the true misspellings as well. Looking at these first while you are mentally fresh might help reduce the chances of overlooking a misspelling.
- Group all words containing a specific character (or characters) using the dialog functions or the more versatile Select and Group all Suspects with Matching Text command on the Inbox pop-up menu. For example, you could collect all suspects containing underscores (e.g. HKEY_LOCAL_MACHINE) and deal with them as a single unit. The group by example commands will automatically group words containing some of the most common non-letter characters: periods, ampersands, commas, hyphens, apostrophes, underscores, slashes and backslashes.
- Sort words by size using the dialog or the Inbox "Number" column sort button. This is useful if you have a lot of short "noise" fragments.
Tip: use the grouping and sorting commands before you begin to visually scan the Inbox for errors. This way, you won't "lose your place" when you rearrange the Inbox contents. If you need to give a "sort" or "group" command after you have already visually checked a significant number of suspects, you can avoid this problem by first accepting all of the suspects you have checked so far. Simply highlight the line where you left off and then use the Accept All - From Current Selection to Top command (or press the <T> key).
Tip 2: if you are using the dialog with a very large suspect list, or on a slow machine, you'll probably find that turning off automatic updating (or closing the dialog) improves the performance of certain Inbox commands. If you need to reopen the dialog, you can do so using the Inbox pop-up menu Show command.
Another way to reduce your workload is to reduce the number of suspects that appear in the Inbox. Here are some possibilities:
- Use user dictionaries as much as possible, especially DSDs and LSDs as described above. You should never have to re-accept the same suspects when you recheck a document.
- Use MicroSpell's auto-correct and auto-accept functions. You can activate them using the Options|General Preferences|Spell Checking dialog.
- Modify the set of characters that the speller considers valid within words. These settings are mode-specific so you can have different ones for TeX, ASCII, HTML, and RTF. For example, to change the HTML settings, you would use the Options|HTML Mode Preferences|Characters dialog. Disallowing numbers within words can sometimes make a big difference. Similarly, excluding non-letter characters such as underscore can break up many multi-part suspects so the Inbox will contain only one instance of each of the unknown parts.
- If you are working with TeX documents, check whether there are TeX commands whose arguments should be skipped, and whether there are "\begin{} ... \end{}" environments whose contents should not be checked. You can tell MicroSpell about these on the Options|TeX Mode Preferences|Miscellaneous dialog.
- Use a more comprehensive dictionary such as Lrg-main.lex, Main-more.lex, or Names-places.lex, but read the caveats first.
How to Check and Correct a Large Number of Files
You can check any reasonable number of files using the steps given
above. However, if your project
contains a large number of files (especially if they are short),
you'll probably benefit from the more efficient (but more complicated)
step-by-step procedure given here.
How to Check Text in Other Windows (WordPad, Web pages, E-mail, etc.)
MicroSpell can "grab" text that you have entered in another program (for example, your E-mail program or your browser), correct it, and return the corrected text to the original window. You can learn all the details by reading the hotkey spell checking topic.
| |
Try this first: activate the window containing the text you want to check by
clicking on it. Press <Ctrl>-<F12>, the default hotkey. Your text
should be copied to MicroSpell and spell checking will start automatically.
When you have corrected the last misspelling, press the Done button
and your text will automatically be returned to the original window.
For step-by-step instructions, and to learn the current hotkey setting, use the File|Spell Check Text in Another Window command. For additional information, see How to Use Hotkey Spell Checking. |
Note: This works best if you have installed the MicroSpell tray icon which appears as a red check mark in your taskbar system tray. See Installing and Using the MicroSpell Tray Icon for more information.
The first time you use hotkey spell checking, you might want to type a few lines into Notepad or WordPad and try it from there. If it works, you can be sure it's set up properly. If it doesn't work, check the hotkey setting on Spell|Change Hotkey Spell Check Settings/Define Scripts. Also see the Hotkey Mini-FAQ, Q5.
Tip: Hotkey spell checking can also be used to grab files that you want to spell check from Windows Explorer or "Find Files." Just select the file or files you want to check and press the hotkey. This is easier than dragging and dropping them on the speller.
Tip 2: Although you can check individual web pages directly from your browser window, this is not the best way to check your entire site. See How to Automatically Check a Linked Group of HTML or TeX Documents for a better way.
Tip 3: We did not provide a hotkey spell check "script" for Microsoft Word because we do not recommend you use hotkey spell checking with Word, at least until you have considered the issues discussed in the Text Formats section.
How to Check Text on the Clipboard
MicroSpell can check text on the Windows Clipboard; this means you can easily spell check text from any application that can copy text to and from the Clipboard. (However, refer to Tip 3 at the end of the previous section before you paste corrected text back into Microsoft Word.) Hotkey spell checking (discussed in the preceding section) is usually easier than Clipboard spell checking because MicroSpell does all of the cutting and pasting for you. However, Clipboard spell checking can be used in instances where hotkey spell checking does not work; also, it does not require the speller to be running beforehand, and it automatically closes the speller when you finish.
| |
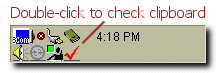
To check text on the Clipboard, first select and copy the text if it isn't already there.
Then double-click the MicroSpell tray icon (the red check mark in your taskbar system
tray near the clock).
If you did not elect to install the speller tray icon, there is an alternative. Click the "Check Clipboard" icon (see below) in MicroSpell's program group (or on your Start menu, if you chose that installation option). When you save the text in MicroSpell, it will be returned to the Clipboard. You can then copy it back to the original source. |
The "Check Clipboard" Icon
 The installation program creates a special "Check Clipboard" icon; it also
offers to place the same icon on the Windows "Start" menu so you can do a
Clipboard spell check as quickly as possible. Whether you use the icon from
the MicroSpell program group or the Windows "Start" menu, the procedure is
the same: copy some text to the Clipboard and click the "Check Clipboard"
icon. If there are no errors, the speller will tell you this using a
self-closing dialog, then automatically exit. If the Clipboard contains
only a single unknown word, MicroSpell displays just the Lookup dialog rather
than the Inbox, Outbox, and main window.
The installation program creates a special "Check Clipboard" icon; it also
offers to place the same icon on the Windows "Start" menu so you can do a
Clipboard spell check as quickly as possible. Whether you use the icon from
the MicroSpell program group or the Windows "Start" menu, the procedure is
the same: copy some text to the Clipboard and click the "Check Clipboard"
icon. If there are no errors, the speller will tell you this using a
self-closing dialog, then automatically exit. If the Clipboard contains
only a single unknown word, MicroSpell displays just the Lookup dialog rather
than the Inbox, Outbox, and main window.
If you correct any misspellings in the Clipboard text, MicroSpell will copy the corrected text back to the Clipboard when you press the Inbox "Done" button (or the Lookup dialog "Copy Replacement" button). You can then paste it into the window from which you originally copied it.
When MicroSpell is checking Clipboard text, it closes as soon as
you press the Inbox "Done" button (or dismiss the Lookup dialog). If you
want to close the Inbox without exiting from the speller, use the
toolbar button to stop the spell check. You can then either recheck the text or use the
main window Edit|Copy command to return the corrected text to the Clipboard.
If you use this function often, consider adding a keyboard shortcut. You can do this by right-clicking on the Check Clipboard icon, choosing "Properties," and typing your shortcut in the "Shortcut Key" box of the "Shortcut" tab.
How to Use the Replace/Lookup
Dialog to Modify Dictionaries: Finding, Adding, and Removing Words
Here are some ways you can use the Replace/Lookup dialog to modify
dictionaries. As the points below show, you can do some things here that
are inconvenient or impossible to do elsewhere. From the Inbox or the Outbox, double-click on
the suspect to invoke this dialog. Alternatively, use  or <Alt-L> from the main edit window after
selecting a word. Click here to see the help topic for this dialog.
or <Alt-L> from the main edit window after
selecting a word. Click here to see the help topic for this dialog.
- How to look up the spelling of a word when the speller doesn't offer the correct guess: Invoke the Replace or Lookup dialog as described above, edit the "Replacement" box or type a new word using wildcard characters where necessary, then use the Lookup button. You can also select part of the Replacement box text to focus the Guess or Lookup function on just the selected text.
- How to save an edited version of the suspect: After you invoke the Replace or Lookup dialog as described above, copy the word to the "Replacement" edit box using the "Copy Down" button, if necessary. Edit the word, set the save destination, then press the Save button. You can repeat this process to save several inflected forms of a new word. You can use the Remove button to "unsave" a word if necessary.
- How to save the current suspect and your correction as an auto-correction pair: Invoke the Lookup or Replace dialog as described earlier and make sure the "Replacement" edit box contains the desired correction. Press the +Auto-Correct button. (If the button is inactive, use the context help command to learn the possible reasons; most likely, the Replacement box contains an exact copy of the suspect.) You can use the same button to remove an auto-correction pair. Using this method, you can only add an auto-correction for the current suspect. If you want to add an arbitrary auto-correction pair, invoke the Dictionaries dialog, select the (an) auto-correction dictionary, and press the View/Edit button. Type the new auto-correction(s) and save the updated dictionary. You can have MicroSpell save an auto-correction pair automatically whenever you give a Replace All command by enabling the Make Auto-Correction entries following "Replace All" commands option on the Options | General Preferences | Spell Checking dialog.
-
How to find out which dictionary contains a given word: Invoke
the Lookup or Replace dialog as described earlier. If necessary,
type the word you are looking for into the "Replacement" edit box. The
word should turn black indicating that its spelling has been verified.
(If it doesn't then the word isn't in an open dictionary.) One or more
of the checkbox labels grouped with the Lookup button should
be blue, indicating that the word was found in a main or user
dictionary, and showing whether or not the match was exact. The "Main"
and "User" labels have pop-up tooltips that will tell the
exact dictionary, and "go to" buttons
 that will take you directly to the word.
-
How to remove any word from any dictionary: If you
saved the word to a user dictionary using one of the
Inbox Save To commands, go to the Outbox and give an
Undo command for the word. If undo is not appropriate,
Invoke
the Lookup or Replace dialog by double-clicking a
suspect in the Inbox or Outbox.
Enter the word into the
"Replacement" box if you have not already done so.
If the word is found in a user
dictionary, set this dictionary in the combo box next to
the Remove button, then press this button. If the
word is found in a main dictionary, or the word you have
entered in the "Replacement" box is not an exact match in spelling
and capitalization, the Remove button will not be active. Instead,
edit the dictionary directly by pressing the appropriate "go to"
button.
How to Create a New Dictionary
Before you create a new dictionary, you must decide whether you want to
create a main (compressed) or
a user dictionary. If it will be relatively
small (several hundred to several thousand words) make a user dictionary.
If you expect it to hold more than about 30,000 words, you must create a
compressed dictionary.
The words to be added to the dictionary should be in a standard text file with one word per line. If they are in any other format, or to consolidate several files into one, you can use MicroSpell's "Learn" command available on the Spell menu. If your word list uses a nonstandard representation for accented characters, MicroSpell has a function that can help translate them: see Importing an Ispell Word List
| |
If you are creating a new user dictionary and you know your word list is in the proper format, you can skip the steps below and simply use the Add Dict. button on the Dictionaries dialog to turn your list into a new user dictionary. If you see a "broken dictionary" icon when you try to open your new dictionary, see User Dictionaries for more information. |
Once you have a list(s) of words to add to your dictionary, do this:
- Use the New Dictionary dialog (available via the New Dict. button in the Dictionaries dialog) to create a new empty dictionary and add it to MicroSpell's dictionary list. (See the preceding link for step-by-step instructions, if necessary.)
- Your new dictionary should appear in the Dictionaries dialog dictionary list. Select it, if necessary, and press the View/Edit button. You should see the View/Edit dialog.
- In the View/Edit dialog, use the Browse for File button to open the file that contains your word list. Then press the Add button to add the words to the edit box. If necessary, you can "browse" and "add" repeatedly if you have more than one file. Alternatively, you can copy-and-paste words into the edit box.
- When you have added all of your words to the edit box, press the Save button. If there are any problems with your list, MicroSpell will show you the first one; you can edit the list and try saving again.
- Double-click the dictionary (book) icon in the dictionary list to open and use it.
How to Look Up Definitions, Synonyms, and Spellings Via the Internet
When you are working within MicroSpell, you can quickly look up the spelling or definition of a word (or search for synonyms) on any of several Internet sites. MicroSpell either uses its internal browser (if you have Internet Explorer 4 or higher installed) or forwards the word and your request to your default browser which displays the results.
| |
To look up a word on one of the predefined Internet sites, make sure the word is
selected (highlighted) in the main window, Inbox, or Outbox, or copy it to the Clipboard from
anywhere else. (If there is no selection,
the speller tries to take the word form the Clipboard.) Then do any one of the
following:
You can also do a web lookup if MicroSpell is not currently open. See Web Lookup from Other Applications immediately below. |
Web Lookup from Other Applications: Copy the word to the Clipboard, then
click the  icon in the MicroSpell program group,
 or on your
Windows Start menu if you chose this installation option. This will launch MicroSpell's
Web Lookup dialog with your search word automatically entered. Alternatively,
you can double-click MicroSpell's tray icon (the red check mark in the taskbar
system tray near the clock) while holding the "Alt" key down. Or you can right
click on the tray icon and select your web lookup destination from the popup menu.
or on your
Windows Start menu if you chose this installation option. This will launch MicroSpell's
Web Lookup dialog with your search word automatically entered. Alternatively,
you can double-click MicroSpell's tray icon (the red check mark in the taskbar
system tray near the clock) while holding the "Alt" key down. Or you can right
click on the tray icon and select your web lookup destination from the popup menu.
Web Lookup of a List of Words: If MicroSpell's internal browser is available, the Web Lookup dialog will contain an active checkbox labelled "Get List from Clipboard". You can use this function if you would like to lookup a group of (up to 40) words at once, which is more efficient than looking them up one-at-a-time. Simply copy a list of words (one per line) to the Clipboard, make sure this checkbox is checked, then press Go or double-click a lookup destination. The browser will cache a results page for each word, and you can view them using the Forward and Back buttons. Hint: if you are looking up a list of words from one of MicroSpell's windows (e.g. the Inbox or Dictionary View/Edit dialog), you might find it more convenient to start a separate instance (i.e. by clicking the Web Lookup icon in MicroSpell's directory, or on your start menu if you allowed to installer to put one there). This will allow you to switch back and forth without closing the Web Lookup window. You can combine this option with the following option.
Web Lookup with Multiple Lookup Destinations: You can select multiple lookup destinations in the Web Lookup list box. The internal browser will visit each of the selected sites and cache the results which you can then view using the Forward and Back buttons. You can only visit multiple sites if the internal browser is available; if the speller has to launch your default browser, it will visit only the first selected site. You can combine this option with looking up a list of words (see previous item).
Adding New Web Lookup Sites: You can edit the predefined sites that MicroSpell uses for web lookup using the Options|General Preferences|Web Lookup dialog. To add a new site, you need the URL that is used for lookup. To obtain this, go to the site using your browser and perform the lookup that you want MicroSpell to imitate. When your browser contacts the site, it will display the URL that it is using in an edit box near the top of its screen. Select this URL and copy it to the Clipboard. Switch to MicroSpell's Options|General Preferences|Web Lookup dialog and press the New Item button. Paste the URL into the "URL" edit box. The URL should contain the search word that you entered in the browser; replace this word with "%s" (without the quotes). If you don't see your search word in the URL, try appending "?%s" to the URL. (If this doesn't work, you'll have to examine the web page's HTML source to construct an appropriate query. For an example, see MicroSpell's link to Webster's Thesaurus.)
Finally, make up a name for the URL and enter it into the "Name" edit box; this name will be used on the Web Lookup menus. If you want to change the new site's position in the lookup order (used when you press <Ctrl-W> repeatedly), use the Move Item Up or Move Item Down button. To save your work, press OK, then OK again to dismiss the Web Lookup dialog.
Problems with Web Lookup: When some users give the Web Lookup command on certain dictionary sites, MicroSpell randomly appears to lock up. If you are experiencing this problem and do not wish to avoid the associated sites, MicroSpell offers the following workaround. On the Options|General Preferences|Web Lookup dialog, make sure the "Use External Browser" option is checked. This will force MicroSpell to use your default browser instead of its internal browser window in certain cases, e.g., when you use the Web Lookup keyboard shortcut (CTRL+W) or when you right-click on the MicroSpell tray icon and use the "Look Up Definition of Clipboard Word" command. (Other ways of doing a web lookup lead to the normal dialog so you can choose which interface you prefer on a case-by-case basis and so you can still have access to the settings that are only available through this dialog.) You can find more information in the MicroSpell FAQ.
Some Simple But Useful Tips
Here are some tips that will make the speller more convenient to use
and help you solve some common problems.
- How to highlight words in the Inbox and Outbox: Save time by
taking advantage
of the fact many speller commands operate on groups of selected suspects
as easily as on a single suspect.
Desired Inbox/Outbox Selection How to Do It Single Suspect Click on it Contiguous Group of Suspects Click on first item, then click on last while holding the <Shift> key down. Contiguous Group of Suspects Hold left mouse button down while sweeping over the group (See note 1 below) Noncontiguous Group of Suspects Click on each item while holding the <Ctrl> key down (See note 2 below) De-select Individual Suspects Click on each item while holding the <Ctrl> key down All Suspects Press <Ctrl-A> All Suspects Use "Select All" command on right mouse button pop-up menu Fast Mouseover Select/De-select Enable "Show | Inbox/Outbox Mouseover Selection Bar" on the Inbox right mouse button pop-up menu Group and Select Similar Suspects Click the icon next to the suspect Note 1: If you are selecting suspects by sweeping with the mouse and you start your sweep directly on an already selected suspect, you will see the "no drop allowed here" cursor because you will be performing a drag, rather than a selection. To ensure a selection, do not click directly on a suspect when you are starting a sweep.
Note 2: If you find that you frequently use this technique, make sure you aren't overlooking MicroSpell's grouping commands which automatically group and select certain classes of suspects.
- How to stop a spell check without saving your document to disk: Press the red
"check" button on the toolbar of the main edit window (the same button you
use to start a spell check). Alternatively, press <Esc> from the
Inbox, use the Close Inbox Without Saving Document command on the pop-up
menu, or use the standard window close button. From the Spell Check dialog, press
<Esc> or use the Close button.
When you do this, your
document will not be saved to disk, but all of the changes you made
will remain. You'll still be able to save your document later if you want. If you also want
to close your document immediately without saving any changes you might have made,
use the
 toolbar button.
- How to conveniently arrange the speller's windows on your screen: Use the Window|Layout commands on the main edit window. First, make the main window your preferred size; a relatively small main window works best. Start a spell check and switch to the Inbox, if necessary to enable the Layout commands. The Inbox and Outbox will be resized and moved according to the size of the main window and the Layout command you choose. Experiment to find the most effective arrangement. If you use the Spell Check dialog, you can set a different (presumably larger) main window size that will be remembered independently of the setting used while the Inbox is open. (The Layout commands do not work in conjunction with the Spell Check dialog.)
- How to adjust your Inbox and Outbox column widths: You can click on any divider between sort buttons and drag it to resize the column to the left. You can double-click the Suspect column divider to make the column large enough to hold the longest suspect item on the visible page. You can double-click the divider to the right of the Context column to change it so all columns are visible without a horizontal scroll bar.
- How to find the Outbox if it gets covered by the Inbox (or vice versa): Use the View|Outbox/Inbox Alternate command.
- How to make auto-corrections truly automatic: Go to the Options|General Preferences|Spell Checking dialog and enable the "Automatically correct suspects that match Auto-Correction entries" option. This will cause the speller to make the corrections automatically; they will appear at the end of the Outbox when it is first displayed. You can review them and Undo any inappropriate changes. Tip: you can have MicroSpell save an auto-correction pair automatically whenever you give a Replace All command by enabling the Make Auto-Correction entries following "Replace All" commands option on the Options | General Preferences | Spell Checking dialog.
- How to save a word in any user dictionary from the Inbox or Outbox: If the destination
is not on one of the Save To buttons and you don't want to change
any settings, use the Save (+) or Remove (-) Selected Suspects
command on the
pop-up menu of the Inbox or Outbox. If the word you are saving is
capitalized because it is the first word of a sentence and you want the
speller to recognize any reasonable capitalization, use the "made lower
case" version of the save commands. You can also open the Dictionaries
dialog by pressing
 and then drag your word(s) to
any user dictionary. (Note: you have click directly on one of the selected
suspects to start dragging them; don't be confused by the "no drop"
cursor icon that immediately appears—it just means that you can't
drop the words on the Inbox or Outbox.)
and then drag your word(s) to
any user dictionary. (Note: you have click directly on one of the selected
suspects to start dragging them; don't be confused by the "no drop"
cursor icon that immediately appears—it just means that you can't
drop the words on the Inbox or Outbox.)