The Spell Check dialog lets you do all of the standard spell
checking functions: accept or save correctly spelled words, fix
misspellings and save auto-corrections. In addition, you can
look up the
spelling of any word in MicroSpell's open dictionaries using wildcard
characters to substitute for letters you're unsure of, look up the
definition of any word (if you're connected to the Internet), drag-and-drop
or copy-and-paste words into user dictionaries, save the current
suspect to a document or location-specific dictionary, or
easily adjust the capitalization of your corrections. The latter is
very useful if you need to distinguish between two letters that look
identical in the current font.
After you have dealt with the last suspect, the speller displays the
dialog shown here.  The top section shows word count statistics (which are also available
on the Document List Dialog), while the lower
section has buttons for saving your document and/or the suspects
which you have accepted. Saving your accepted suspects will keep them from
reappearing the next time you check the same document. The Save to DSD then
Save Doc. and Save to LSD then Save Doc. buttons save all suspects
for which you gave an Accept All command plus those which MicroSpell
auto-accepted. You might find it easier to use these buttons instead of the
+D or +L buttons
discussed below. (You can learn
more about saving to the DSD or LSD by taking either of the previous links.)
The top section shows word count statistics (which are also available
on the Document List Dialog), while the lower
section has buttons for saving your document and/or the suspects
which you have accepted. Saving your accepted suspects will keep them from
reappearing the next time you check the same document. The Save to DSD then
Save Doc. and Save to LSD then Save Doc. buttons save all suspects
for which you gave an Accept All command plus those which MicroSpell
auto-accepted. You might find it easier to use these buttons instead of the
+D or +L buttons
discussed below. (You can learn
more about saving to the DSD or LSD by taking either of the previous links.)
The Show Outbox for Review/Undo button does the same thing as the
Show List button on the Spell Check dialog (see below).
However, on this dialog it gives you the option to "back up" after you have finished
the spell check. This is especially useful if the only suspects were auto-accepted and
you did not have the opportunity to use the Spell Check dialog.
You can view the Outbox to
undo one or more of your earlier actions, or simply review how all of the suspects were handled.
This capability gives users of the Spell Check dialog the same degree of control that users of the Inbox/Outbox
combination enjoy.
The Save Document button saves the current document (it is written
to disk only if it has been modified), then spell checks the next document,
if any. The Cancel button does not save the document and does not
proceed to the next document. Any changes you made will remain and you can
still save them using the main window Save command.
If you get tired of seeing the button tooltip help, you can turn it off
by right clicking on the dialog and unchecking the Show Tool Tip Help
option.
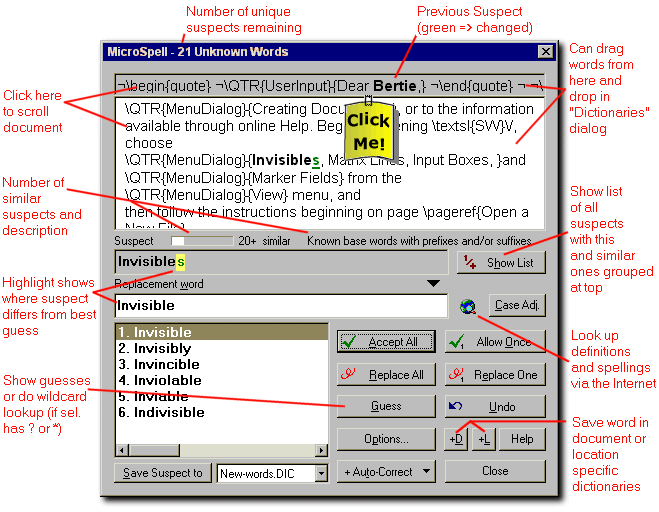
Here are descriptions of each of the Spell Check dialog
controls. You can jump directly to the documentation for a particular control
by clicking it in the figure above.
- Allow Once button
- This
function lets you skip past the current instance of the suspect
without changing it. This command is similar to Microsoft Word's
"Ignore" command. It is not used very often; perhaps the main use is
to accept particular instances of misspellings. It differs from
Accept All by not saving the suspect, even temporarily.
- Accept All button
-
This
command causes the speller to accept all instances of the current
suspect and add them to a temporary user dictionary (the Accept All list). This
suspect becomes a "known word" until you exit MicroSpell and
can appear as a guess (unless you disallow
it), can be used in suspect coloring, can appear in
lookup results, etc.
For users of earlier
versions of MicroSpell, this is equivalent to the "Ignore" command
and the keyboard shortcut <I> is also
valid. Because this button gets the focus every time the speller
scrolls to a new suspect, you can also use <space> or <Enter> as
keyboard shortcuts. If you're familiar
with Microsoft Word, this is similar to
the "Ignore All" command.
Words that you accept remain known only until you exit MicroSpell.
If you would like them to be known next time you check this document, you should use
either the Save to DSD or the Save to LSD
function instead. Alternatively, you can save all of them at once at the end
(see above).
If you would like accepted words to be
known in the future when you check any document, use the Save Suspect command.
- Auto-Correction button
- Use
this button to make an auto-correction entry using the
current Suspect and Replacement box text (this operation ignores any
selection in the Replacement box). If this button is not enabled,
either the Replacement box contains the same text as the suspect box
(you may not replace a word with itself), or the auto-correction save
destination has not been set. You can set this using the drop-down
menu on the button. Once you have successfully saved an
auto-correction, the button text changes to "-Auto-Correct" to
indicate that you can undo the save by pressing the button again.
See Replace All below
for a way to automate creating auto-corrections.
- Case Adjust button
- Converts
the Replacement box text to be capitalized, all upper case, and all
lower case, taking one step through this sequence each time you press
the button. If there is a selection, only it is affected. Tip: with
certain fonts, you cannot distinguish "one" vs. lower case "el"
or lower case "el" vs. upper case "i". Occasionally, you'll need to
resolve this ambiguity for a particular suspect. Use this command to
reveal the identity of the character in question.
- Close button
- Closes the Spell Check
dialog. All your changes are preserved, but the document is not saved immediately.
(If it's been modified, the speller will ask whether you want to save it before
you exit.)
- Context box
- Shows the current suspect
in context. The suspect is shown in bold type; color is used to split possible
compound or run-together words, to indicate recognized and unrecognized fragments,
and to show possible prefix-base-suffix splits. (Use the options
button to change colors.)
If the suspect is close in
spelling to the speller's best guess, an underscore indicates where they differ.
You can click anywhere in this box to scroll the document so the suspect is
visible. You can copy or drag words from here and drop or paste them into
the Dictionaries dialog to save them.
- Copy Suspect button
- Copies the
text in the Suspect box to the Replacement box. If the
Replacement box has a selection, only the selected text will be
replaced.
- User Dictionary list
- Use this
drop-down list to set the current destination for the Save Suspect button.
- Guess button
- This button runs the
Guess function which attempts to find words that are close in
spelling to the word in the Replacement box and shows the results in
the Guess list. This function runs automatically
on each new suspect. To
generate suggestions for just part of the text in the Replacement
box, highlight that part first. Note: to prevent confusion, the
Guess function never returns the exact string for which you request
guesses.
If the Replacement box contains either of the wildcard characters ?
or * (asterisk), the Guess button becomes the Lookup button.
The Lookup function searches all of the open dictionaries
for words which match the search string in the
Replacement box. You can highlight the desired
Replacement box text if you want to focus on less than the entire
contents, but make sure your highlight contains a wildcard
character. Use ? to stand for any single character;
use * to represent any number of characters, including none. Here are
some examples.
The search key *zz would match all words ending with
"zz".
The key a*l? matches all words which
begin with the letter "a" and have "l" as the next to last letter.
The key *d*d* matches all words which contain at least two d�s.
These lookups are not case sensitive, and as indicated above, they
use all open dictionaries. If you need more control over the search,
use the Lookup dialog instead.
- Guess list
- This list shows the current guesses or
lookup results. The capitalization of the
guesses is adjusted to match the search word; the lookup
results are shown exactly as they appear in the dictionary.
Click any line to insert that line into the Replacement box in
place of the current contents. If the Replacement box contains a
selection, only the selected text is replaced. (Tip: if you
unintentionally overwrite your replacement text, right-click in the
Replacement box and use Undo to get it back.) Double-clicking any
line, or pressing the associated number key, is like double-clicking a
guess in the Inbox: a Replace One or
Replace All (the default) command is performed depending on the setting in
Options|General Preferences|Miscellaneous|Replace Options.
Windows limits the number of entries MicroSpell can put on this list;
you'll see a warning message if your lookup command matches more
than the limit.
- Help button
- Displays the help topic you are now reading.
- Options button
- Use this button to change the
fonts or colors used in this dialog (the same colors are also used in the Inbox). You can
also change or view the auto-accept and auto-correction settings, clear the Accept All
list, and make some minor user interface changes such as disabling tool tip help.
- Previous Suspect box
- Shows
the most recent suspect in context. If you made a correction, it is
shown in bold green (same as the "Compound Split-1" color
on the options dialog) type; otherwise, it appears in bold
black type. You can click anywhere in this box to scroll the
document so the (previous) suspect is visible. If this box is not blank when
the Spell Check dialog first opens, you are seeing one of the suspects
that the speller auto-accepted or auto-corrected. You can use the
Show List
button to display the Outbox if you want to review all of them.
You can copy or drag words from
here and drop or paste them into the Dictionaries dialog to save them.
- Replace All button
- This
function replaces the suspect that is currently highlighted in the
main edit window, and all identical instances of the same suspect, with the entire
contents of the Replacement box (the
selection, if any, is ignored). To
replace only the single instance of the suspect that is currently
highlighted in the main document, use the Replace One button instead.
The button text changes to
"Delete All" if the Replacement box is empty. The button will be
disabled if the text in the Replacement box is identical to the
suspect because you may not replace a suspect with an exact copy of
itself. The speller will remember this correction until you exit
by adding it as a temporary auto-correction to the
Replace All list.
You can have MicroSpell save an auto-correction pair automatically
whenever you give a Replace All command by enabling the
Make Auto-Correction entries following "Replace All" commands
option on the Options | General Preferences | Spell Checking dialog.
- Replace One button
- This
function replaces the suspect that is currently highlighted in the
main edit window with the entire contents of the Replacement box (the
selection, if any, is ignored).
Only one instance of the suspect is replaced each time you press this
button. To
replace all instances of the same suspect, use the Replace
All button. The button text changes to "Delete One" if
the Replacement box is empty. The button will be disabled if the text
in the Replacement box is identical to the suspect because you may
not replace a suspect with an exact copy of itself. If you have
enabled the "Make Auto-Correction entries following "Replace All" commands"
option (see Replace All above), you can use this function
to avoid creating an auto-correction for a particular suspect.
- Replacement box
- This edit
box lets you enter an arbitrary replacement for the suspect.
To guard against
replacing one misspelling with another, the spelling is checked
automatically whenever you modify the text in this box and the color
is changed to show the results.
By default, MicroSpell will warn you if
you attempt a replacement with an unrecognized word; you can disable this
using Options|General Preferences|Miscellaneous|Replace Options if
the color is sufficient warning for you.
If this box is empty, the Replace buttons turn into Delete buttons
and the suspect word highlighting in your document is adjusted to
cover any spaces preceding or following the suspect that will be
removed with it. If this text exactly matches the suspect word, the
Replace buttons will be disabled because you may not replace a word
with itself. If there is an exact spelling match (whether or not the capitalization
matches) MicroSpell inserts "=" before the label. This is an easy way to tell
that the speller is complaining about the capitalization rather than a
spelling error.
If you want to focus on part of this text for spelling
assistance, capitalization adjustment, etc., highlight the part you
want to work with.
The Replace One, Replace All,
and Auto-Correction buttons ignore any selection and use all of the
text in the Replacement box.
You don't have to remember this: the pop-up
tool tip help for these buttons uses the phrase "full Replacement box text."
- Save Suspect button
- Use this button to save
the current suspect to the user dictionary
shown on the user dictionary list. Note that this differs
from the Replace/Lookup dialog where the Save button saves the text in the
Replacement box. If you want to save something other than the suspect word, you'll
have to use the Lookup dialog or drag-and-drop it on a user dictionary. For example,
if you want to save an edited version of the suspect, copy it to the Replacement box,
edit it, then drag it and drop it on the desired user dictionary icon in the Dictionaries
dialog.
Whenever
you save the current suspect, the speller automatically does an Accept All command
and proceeds to the next suspect. You can use Undo to reverse both the Accept All and
the Save, if necessary.
There are two additional special purpose Save buttons that save to the Document-Specific and
Location-Specific Dictionaries (described next).
- Save to DSD (+D) button
- This button works exactly like
the Save Suspect button (above), except that it always saves to the Document-Specific Dictionary
(DSD). Use this to save suspects that you
don't want to see next time you check this document, but which do not belong in
your general user dictionary. If the current document is one of a group of related
documents (e.g., pages of a web site, chapters of a manual), the Save to LSD function
(next item) will probably be more appropriate.
- Save to LSD (+L) button
- This button works exactly like
the Save Suspect button (above), except that it always saves to the Location-Specific Dictionary
(LSD). Use this to save suspects that you
don't want to see next time you check this document, but which do not belong in
your general user dictionary. All documents in a particular location (directory) share
the same Location-Specific Dictionary, so this function is preferable to the
Save to DSD function (above) if the current document is one of a group of related
documents.
- Show List button
- This button switches to the
Inbox where all of the suspect words are visible at once. If there are other
remaining suspect words that are similar to the current suspect (e.g., all upper case,
repeated, irregularly capitalized, etc.), they will be grouped at the top of the
Inbox and selected. You can visually scan the list, fix any problems, then accept
the remaining suspects all at once instead of one-by-one as you would do in the
Spell Check dialog. You can switch back to the Spell Check dialog
using the Inbox Check One-at-a-Time button.
This command lets you easily take advantage of MicroSpell's grouping
commands without working exclusively in the Inbox. The "Number of Similar Suspects"
Indicator (discussed next) indicates when it is worth switching to the Inbox.
This button is also used to gain access to the Outbox where
the speller keeps a record of all the Inbox and Spell Check dialog
commands you have given and lets you selectively undo them.
This
dialog and the Inbox use exactly the same keyboard shortcut (<Alt-H>) to switch
views. MicroSpell always remembers your current view, so you can use the Spell Check
dialog or the Inbox exclusively by simply ignoring the other one.
- "Number of Similar Suspects" Indicator
- This indicator
shows how may remaining suspects are similar to the current suspect. When there
are more than a few, it is usually worthwhile to switch to the Inbox to deal
with them as a group (see previous item). The text to the right of the meter
describes the similarity criterion.
- Suspect box
- Shows the current
suspect. If the suspect is a repeated word, it will be noted here
for emphasis. You cannot
edit this text; copy it to the Replacement box to work with it.
- Undo button
- Use this button to undo the
most recent command and return to the previous suspect. There is no limit
on how far you can undo, but if you want to undo many previous commands,
try using the Show List button, then use the Outbox Undo command instead.
The advantages are that you can select an arbitrary number of previous commands
and undo them all at once, and you can undo any earlier command(s) without
undoing all of the intervening commands.
- Web Lookup graphic
- Click this
graphic to look up the text that is selected in the Replacement box,
or the current suspect if there is no selection, using one of the
Internet dictionary sites. For more information, see
How to Look Up Definitions, Synonyms,
and Spellings Via the Internet.
The Options button displays the Spell Check
Options dialog where you can change colors, fonts, etc. See the discussion above
for more information.
![[Help Contents]](mshelptopic.gif)

![[MicroSpell Home Page]](text4.gif)
 What is the Spell Check Dialog?