![[Help Contents]](mshelptopic.gif)

![[MicroSpell Home Page]](text4.gif)
- Checking Text in Web Forms, WordPad, Notepad, Your Email or Other Windows
- Checking Documents Stored in Files—HTML, TeX, RTF, or Plain Text
- Checking Text on the Clipboard, and Looking Up Definitions or Synonyms for the Clipboard Word
- Adjusting Speller Fussiness
- A Few Words About Dictionaries
- Understanding Suspect Coloring in the Inbox and Spell Check Dialog
- Toggling Between the Spell Check Dialog and the Inbox/Outbox View
- Simple Spell Checking Via the Inbox
- Suggested Window Arrangement
- Getting Help
 Checking Text in Web Forms, WordPad, Notepad, Your Email or Other Windows
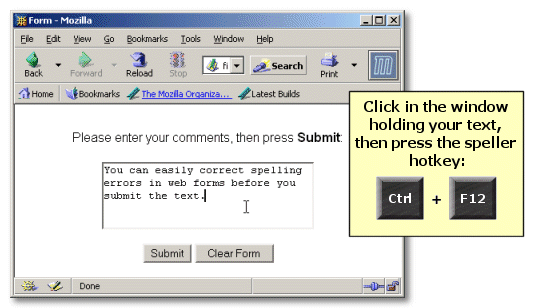
- This is called "Hotkey Spell Checking." When you press the hotkey, MicroSpell copies the text from the other window, checks it, and returns the corrected copy automatically.
- Hotkey spell checking is controlled by the last two items on MicroSpell's Spell menu. From there, you can change the default hotkey or define new "scripts" if MicroSpell does not provide them for a particular application.
- If hotkey spell checking isn't working as you expect, see the Hotkey Mini-FAQ for advice. (You can test it on this page by pressing the hotkey now—the speller should be able to check the text in most browsers.)
- When you use hotkey spell checking, the speller automatically saves the last text you checked in a file named "Last-Hotkey-Copy.TXT" in its DATA\ directory. While intended as a safety precaution, this is also useful for making temporary backups as you work on a long piece of text in a window that does not have a "Save" function, such as a browser form—simply spell check your text occasionally.
For more info, see the How-To topic, or the
full Hotkey Spell Checking topic.
 Checking Documents Stored in Files—HTML, TeX, RTF, or Plain Text
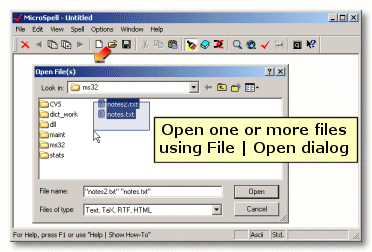
To check text contained in a file, you just have to open it. There are many ways to open files; we show a few of them here.
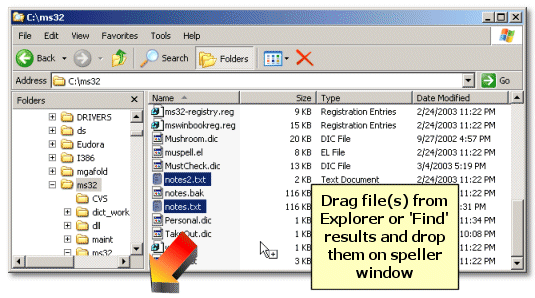
- As a convenience, MicroSpell can launch the Windows Find Files applet: use the Files | Find Files command.
- Note that you can open a single file, or specify several at once.
To Check an Entire Web Site or Group of Linked TeX Files
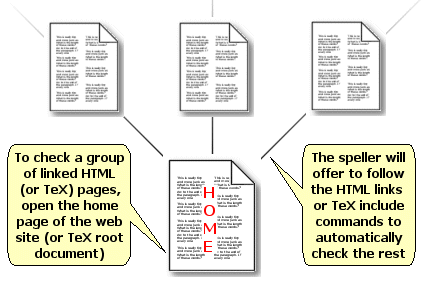
The How-To topic has more info on checking linked documents.
- If you open more than one file, MicroSpell will spell check them automatically one after the other.
- To view or manage the list of files to be checked, you can click
 on the toolbar for
the Document List dialog.
- If you spell check a small group of files time and again, you might prefer to use the "Add Files" dialog via the
 toolbar button. This dialog has a drop-down list that automatically remembers previously opened
files so you can quickly reopen them in the future. (This list is independent of the similar one on the File menu.)
- Normally, MicroSpell will save your corrected text automatically when you finish checking a document. If you want to
abandon your work and close the document without saving any changes, one way is to (un)click the
 toolbar button to stop the spell check, then use the
  button to clear the text (from the speller only, your disk copy
is not affected).
 Checking Text on the Clipboard, and Looking Up Definitions or Synonyms for the Clipboard Word
![]()
- If instead of double-clicking, you right-click on the tray icon, a menu of commands appears. Here we show how to look up a word at a site that is not the default lookup destination.
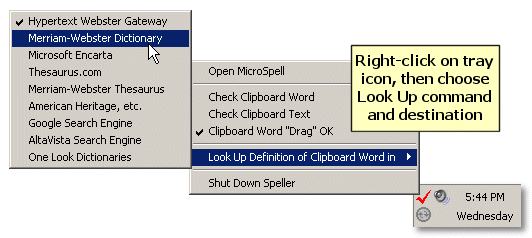
- If you want to know whether the word on the Clipboard is correctly spelled, you can tell immediately from the menu: note the line with the check mark that reads Clipboard Word "Drag" OK. If the word had been unknown, there would have been a submenu of suggestions to replace the Clipboard word.
- The Check Clipboard Word command leads to a more powerful lookup dialog where you can type a replacement, perform wildcard lookups across all of the speller's dictionaries, and much more.
The How-To topic has more info on checking the Clipboard
 Adjusting Speller Fussiness
- MicroSpell has many options that determine how picky it is with respect to suspects that do not match dictionary entries exactly, but are probably not misspellings, such as character sequences that appear to be file names or URLs, etc.
- Instead of adjusting these options individually, you might prefer to use a single control
to set a whole group of them at once for a certain "fussiness" level. Click the
 toolbar button to display the Set Fussiness dialog:
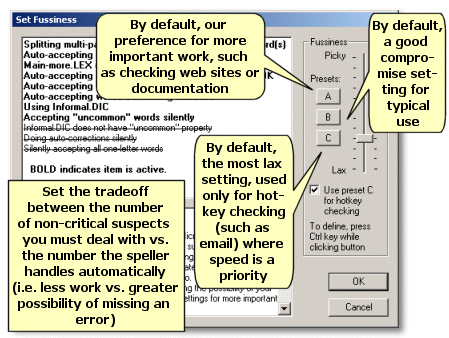
- Note that you can have the setting automatically (and temporarily) jump to the Preset C value during a hotkey spell check. This means that you can have one standard for checking things like email messages and a different (presumably stricter) standard for checking documents stored in files, and the speller will adjust itself automatically.
- You can tell what the approximate fussiness level is without opening the dialog because the
slider on the toolbar button
 roughly tracks the one in the dialog.
 A Few Words About Dictionaries
- MicroSpell comes with several dictionaries that are shown as book icons when you open the Dictionaries
dialog which you can do by clicking the
 toolbar icon.
- You can open and close dictionaries by double-clicking on them. You can add words to (or remove from) user dictionaries simply by dragging and dropping them on the desired dictionary. This is so useful that we prefer to leave this dialog open all of the time.
- The color of the book icon indicates the type of dictionary. Dark blue books
 are main (compressed) dictionaries, which are optimized for storing many words. Because they are compressed, updates are
relatively slow therefore you cannot directly save words to these dictionaries. However, you do have complete
freedom to modify these dictionaries (and all others) using the View/Edit command.
- Light blue books
 are user dictionaries, which are optimized for fast
updates. All of the words you save to customize the speller's vocabulary will be saved to a user dictionary.
MicroSpell provides the "My-additions.dic" user dictionary for your use, and you can create others if you need
them.
- Red books
 represent auto-correction dictionaries. Entries consist of a misspelling
followed by the correction. By default, the speller will automatically replace the misspelling with the correction
whenever it occurs. You can look at the Outbox to see what auto-corrections were made, or
set the Fussiness control to show them in a pop-up list. (If you have a registered version
of the speller, you can have it augment this list automatically as you correct misspellings.)
- You can give the "contains uncommon words" property to any of
MicroSpell's dictionaries (right-click on it for a menu). This property helps to address the conflicting desires to
have a very large dictionary (to minimize false alarms) and a more limited dictionary (to catch typos that
inadvertently produce rare words). Words found in "uncommon" dictionaries are de-emphasized on the guess list and
are not silently accepted—they
appear in the Outbox with the
 icon where you can review them if you choose.
With some settings
of the Fussiness control, they will also appear in a pop-up list together with the
auto-corrections. You can use this to
enforce consistency of spelling for words that have more than one accepted spelling by ensuring that your preferred
spelling appears in the main dictionary and the other appears in a dictionary having the uncommon property.
- As shown below, MicroSpell automatically creates, opens, and manages temporary lists (which we make available in case you want to clear them or otherwise get at their contents) plus Document-Specific and Location-Specific Dictionaries. The latter are useful for saving suspects that do not belong in a dictionary that is always open.
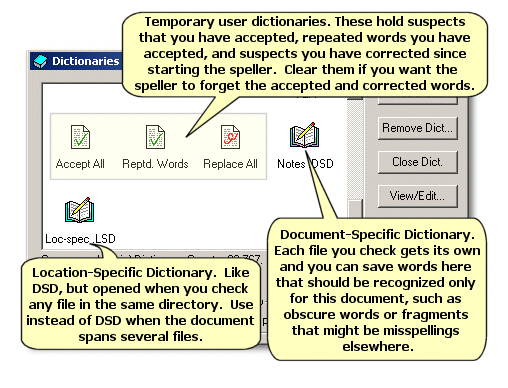
Dictionaries dialog and View/Edit dialog help topics.
 Understanding Suspect Coloring in the Inbox and Spell Check Dialog
- MicroSpell uses color to convey extra information about suspect words. This
information can free you from having to scrutinize the spelling of many word fragments by confirming
their correctness or by highlighting the fact that they are unconfirmed.
Here are
examples of the suspect categories you'll frequently encounter:
- suspcet
- Suspect unknown, or known to be a misspelling (via the auto-correction dictionary). You'll sometimes see a plain red suspect when you might normally expect one of the other schemes below because the other schemes are overridden when the suspect is particularly questionable.
- hypertriglyceridemic
- Suspect unknown, but can be interpreted as a known base word plus a known prefix and/or suffix. You should always examine the guesses for such suspects because the stemming is done algorithmically and is not guaranteed to be correct.
- typeahead NationsBank
- Suspect unknown, but it can be formed by joining two or more known words. These words might be legitimate but unknown compounds, or errors where you accidentally left out a space. Sometimes part of the suspect is unknown and colored red while the rest is shown as a known word, for example: BancOne. This is also done if one of the known fragments is quite short because nonsensical divisions would otherwise be even more frequent than they are now.
- CURSOR_PAN_DOWN http://www.microspell.com
- Suspect unknown, but it is composed of several known words separated by non-letters. These suspects are typically things like URLs, file names, or program identifiers. Note that any unknown fragments will be colored using one of the previously described schemes as in the second example. (Depending on the Fussiness or other option settings, MicroSpell might split these suspects and check each part separately.)
- If you'd prefer a different color scheme, you can customize the colors in any way you like, including reducing everything to a single color if you find the default too busy. You can also change the font and the type size to enhance readability. An easy way to customize colors in the Inbox or Outbox is to right-click on what you'd like to change and give the Colors - Describe or Change command. Alternatively, you can use Options | Set Colors (or Set Fonts).
- If you are working in the Inbox, MicroSpell can automatically group suspects that fall into one of the above
categories (and others). You can quickly scan these visually and, after correcting any typos, dispatch all of them
with a single command. When there are many suspects, this is much faster than accepting each one individually.
To learn more, see Grouping by Example in the How-To topic.
For more information, see Category Icons and Suspect Coloring.
 Toggling Between the Spell Check Dialog and the Inbox/Outbox View
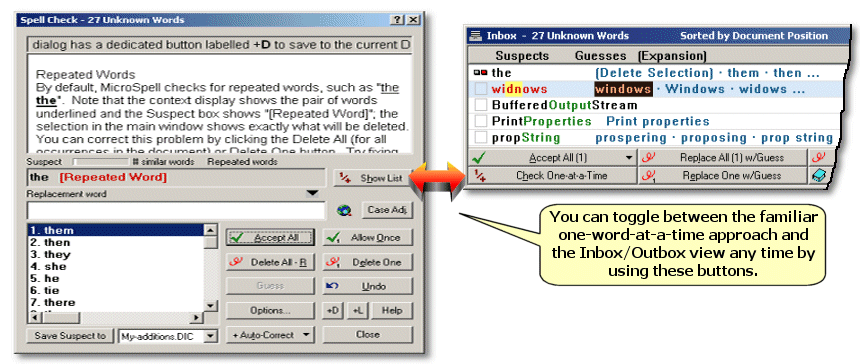
- The Spell Check dialog and the Inbox/Outbox view exemplify a theme that pervades MicroSpell: there is more than one way to do just about everything.
- For greatest efficiency, we prefer using the Inbox for all spell checking. Even if you favor the one-at-a-time dialog, you might occasionally want to switch to the Inbox to Accept All or Save a whole group of similar suspects at once. You can use the buttons shown below to change the spell checking interface anytime. Your preferred mode will remain in effect until you change it. To learn more, see Simple Spell Checking Via the Inbox below.
 Simple Spell Checking Via the Inbox
- The Inbox is MicroSpell's efficient alternative to traditional word-by-word spell checking. The Inbox shows a list of all of the suspects from which you can pick out the misspellings. Since you only have to correct the misspellings, an entire spell check session might take only a single mouse click (if there are no misspellings). The Inbox offers other efficiencies too, e.g., you can save all of the correctly spelled suspects in a user dictionary with a single mouse click. The more suspect words you have to deal with, the more you gain by using the Inbox, especially if you take advantage of the grouping functions.
- Here's an overview on using the Inbox for simple and efficient spell checking. The How-To topic has a more detailed explanation; the preceding section shows how to switch to the Inbox.

- There are other, often easier, ways to open files for spell checking. See Checking Documents Stored in Files above for more info.
- Note that you only have to use the spell check Start/Stop button if checking hasn't started automatically (which it does by default).
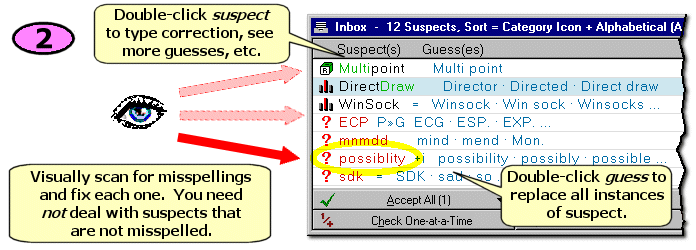
- You can double-click on any suspect to launch the Replace/Lookup dialog where you can do wildcard dictionary lookups, find definitions or synonyms via web lookup, change the capitalization of the suspect or replacement, remove or create an auto-correction, remove or save a word or a variant in a user dictionary. You can edit (or select part of) the suspect to do many of these things with arbitrary text.
- Right-click in the Inbox for a comprehensive menu of things you can do there.
- Even if there are many suspects left in the Inbox, you can click the Done button as soon as you have fixed the last misspelling. Not having to explicitly deal with the suspects one at a time can often save a lot of time.

- The +DSD and the +Accept buttons work just like the Done - Close + Save Doc. - F4 command, except that they first save certain suspects so they won't be reported later as potential misspellings. If you use the +DSD button, the speller will save any remaining Inbox suspects plus any suspects for which you gave an Accept All command. These suspects are saved to the current Document-Specific Dictionary so they will be automatically recognized next time you check the same document. If you use the +Accept button, the suspects are saved temporarily—until you shut the speller down.
 Suggested Window Arrangement
- The first time you run the speller, you might want to rearrange and resize the windows to make it more convenient to use. The figure below shows the arrangement we prefer for normal use. (To get this arrangement, we opened the Dictionaries dialog and resized the main window to match vertically. Then, during a spell check, we used the Window | Layout 1 command to position the Inbox and Outbox.)
- We prefer to leave the Dictionaries dialog open all of the time so
we can save correctly spelled suspects by dragging them to an appropriate user dictionary.
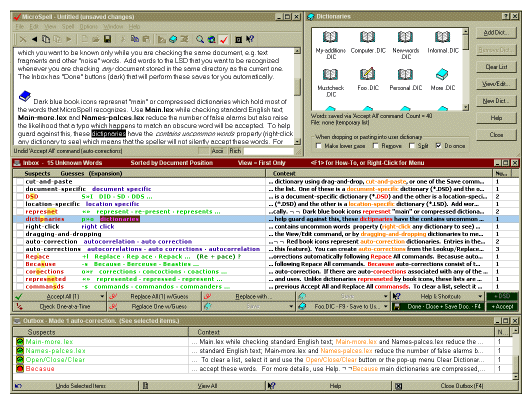
- The speller will automatically remember your settings when you close it. In fact, it will remember three independent settings for the main (text) window: the setting when the Inbox is open, the setting when the simple spell check dialog is open, and the setting when it is not checking text.
 Getting Help
Here's how to quickly get help on any of these items (see below for how to search MicroSpell documentation or our web site):
- Pop-up Menu Commands: Highlight the command and press the <F1> key. Also, note that the status bar in the main edit window has a brief description of the selected command. Users are sometimes puzzled about why certain commands are disabled. The two most likely reasons are: "the Inbox is open" and "the Inbox is not open." In other word, some commands only work while you are spell checking and others work only when you are not. Look at the help for the menu item or control—it will usually say why it might be disabled.
-
Buttons and Controls: Click on the context help icon
 located in the title bar or on a button.
The cursor changes to the same shape; click the item for which you
want help.
- Inbox Keyboard and Mouse Shortcuts: Click the drop-down menu arrow on the Help button.
- Inbox or Outbox Category Icons: Rest your cursor on any icon to see a pop-up tool tip that describes it. For more information, click the Help button, then click on any icon.
- Colors used in Drawing Text in Inbox or Outbox: Right-click on the color you want help on and give the Colors - Describe or Change command.
- Selecting things in the Inbox or Outbox: If you need a refresher on the keyboard and mouse commands used to select items in a list, see How to highlight words in the Inbox and Outbox.
-
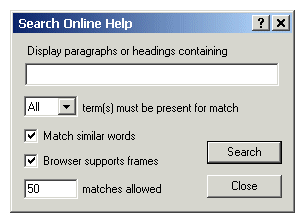
To search the MicroSpell documentation: Use the MicroSpell Help | Search command
to launch the Search Online Help dialog.
- To search our web site: Use the search box below.