![[Help Contents]](mshelptopic.gif)

![[MicroSpell Home Page]](text4.gif)
Dictionary Related
- Recovering From Unintended Changes to User Dictionaries
- Simulating a 'Stop Word' Function
- Word Counts in the Dictionary View/Edit dialog or the Outbox
- Use DSDs or LSDs to Save Work
- Why is the Speller not Opening a DSD or LSD?
- "Learn Remaining Words" Dialog (Obsolete)
Installation Related
- Installing and Using the MicroSpell Tray Icon
- Installing and Using MicroSpell With NT Emacs
- Installing and Using MicroSpell With Epsilon
- Installing/Uninstalling MicroSpell
Problems
- First Line of Inbox or Outbox is Obscured after Font Change
- Why is the Speller not Coloring Skipped Text?
- How to Stop Text from 'Bouncing' During Coloring
- Why is the Speller Not Checking My Document?
- Why Do I Get Fewer Suspects When I Close the Inbox and Recheck?
- Why Does the Speller Work Slowly With Large Files?
- Why Does the Dictionary View/Edit Dialog Work Slowly or Fail to Edit Very Long Word Lists?
- Why is the Speller not Opening a DSD or LSD?
- Why Does the Speller Change the Font or Other Formatting During a Hotkey Check?
- When Two Different Letters Look Identical
Opening Files
- An Easy Way to Check Files From Windows Explorer or 'Find Files'
- Dragging Files When MicroSpell is Not Visible
- How to Check and Correct a Large Number of Files
"How To" Tips
- Maximizing and Arranging Your Windows
- When Two Different Letters Look Identical
- How to Check and Correct a Large Number of Files
- How to 'Allow Once' a Large Number of Suspects
- How to 'Replace' Many Suspects Efficiently
- How to Skip Checking Parts of Your Document
- How Do I Abandon a Spell Check and Restart Fresh?
- How Do I Enable the 'Learn Remaining Words' Dialog During Hotkey Spell Checking?
- How Do I See What Changes Were Made in My Document If It Is No Longer Open?
 An Easy Way to Check Files From Windows Explorer or
'Find Files'
An Easy Way to Check Files From Windows Explorer or
'Find Files'
You can drag-and-drop or cut and paste files from Windows Explorer (or "Find Files") into MicroSpell. However, it's even easier to use the hotkey spell check function: just highlight the files you want to check and press the hotkey. This works because hotkey spell checking simply automates copying and pasting, and MicroSpell allows you to paste either text or files into the main window.
Dragging Files When MicroSpell is Not Visible
If MicroSpell is running but not visible when you start dragging files, drag them to the speller's taskbar icon without releasing the mouse button. This will bring up the speller's main window where you can complete the drop.
Recovering From Unintended Changes to User Dictionaries
The easiest way to reverse Inbox Saves, is to use the Outbox Undo button.
If you've added the words in such a way that Undo is not relevant but the
words are visible in the Inbox or Outbox, you can use the
Save (+) or Remove (-) Selected Suspects
on either pop-up menu. You can also set the "Remove" option in the Dictionaries
dialog then use drag-and-drop or copy-and-paste to remove any words you can "grab."
Another option is to edit the dictionary using the Dictionaries
dialog View/Edit button; the newly added words should be grouped at the
top (if the dictionary has not been closed) where you can remove them manually.
Unfortunately, MicroSpell sometimes silently closes and reopens dictionaries
(to help guard against loss of your updates and while syncing with another
instance of the speller) so you will often not find the newly added words
grouped at the top. In this case, you can use MicroSpell's log to find the
words that have been added. To see the log, give the View | Status Message Log
command, and refer to the help text at the top for details on how to remove words
from user dictionaries.
Closing a User Dictionary Without Saving Changes
If the dictionary has not already been closed, you can have MicroSpell close it without saving any of your changes. To do this, double-click the dictionary icon or use the Close Dict. button in the Dictionaries dialog. You will be prompted for whether or not you want to save the changes; you can decline to save them.
Undoing DSD/LSD Additions After You Have Pressed "Done"
If you've erroneously modified a Document or Location Specific Dictionary by unintentionally pressing the Inbox +DSD (or +LSD) close button, you cannot use Undo because the Inbox and your document will have already been closed. Here's how to reverse the additions:
- Reopen your document so the LSD/DSD dictionaries will be added to the Dictionaries dialog.
- Give the View|Status Message Log command. You should see an edit box that lists all of the words you just added (near the end). Select them and copy them to the Clipboard (you can right-click for a menu). Close the Status Message Log.
- Open the Dictionaries dialog and enable the "Remove" checkbox near the bottom.
- Select the (LSD or DSD) dictionary from which you wan to remove words. You'll find these dictionaries at the bottom of the list. If you're not sure which one to use, you can remove from both.
- Right-click on the dictionary icon and give the Paste command. You should see a message telling how many words were removed.
- You might want to remove the words form the "Accept All" list too. See below. It is not necessary to close the dictionaries; the speller will do it for you.
If you are removing words from dictionaries without using the Undo command, remember that the temporary "Accept All" list usually gets copies of the same words that you add to other dictionaries. Therefore, you should also clear it (or remove the words as described above) to ensure that the speller "forgets" these immediately. One way to clear it is to open the Dictionaries dialog, select the Accept All list icon (near the bottom) and press the Clear List button.
Simulating a 'Stop Word' Function
MicroSpell does not have a "stop word" feature whereby the speller is instructed not to accept a word even though it appears in a dictionary. If you want to permanently keep the speller from accepting a word, MicroSpell gives you complete freedom to edit any of the dictionaries. If you want to temporarily stop a particular word without removing it from the dictionary, you can use an auto-correction user dictionary to achieve this effect. Just enter the word you want to stop, followed by the replacement. Note: you can only stop words in main dictionaries, not user dictionaries using this approach. Furthermore, you cannot stop a word that is one of the approximately 4,000 common English words contained in MAIN.RLX. To stop a word like "something" using this approach, you would also have to temporarily rename MAIN.RLX so it is not used.
Word Counts in the Dictionary View/Edit dialog or the Outbox
The dictionary View/Edit dialog does not automatically display the number of words in the list you are working with. If you need to know this, use one of the sort commands on the pop-up menu; when it finishes, the program reports the number of lines sorted. You can also use the Select All command which reports the number of lines; note that this is often one more than the actual number of words. Similarly, the Outbox does not show a suspect count. You can obtain the count by selecting all suspects using <Ctrl-A> or the pop-up menu Select All command.
How to Check and Correct a Large Number of Files
MicroSpell can easily handle a large number of files. Just add them to the Document List, make sure the Spell|Auto Spell Check on File Open option is checked or use Spell|Spell Check All Unchecked Documents, and it will open, check, and save them one after another. You'll probably find the Inbox command Done - Save Remaining and Accepted Suspects in LSD (on the pop-up menu) useful. It accepts all of the words that remain in the Inbox, then saves all of the accepted words in the location-specific user dictionary before proceeding to the next document. Once you have a location-specific dictionary full of the jargon and "noise words" in the current project, future spell checking should be quite painless.
If your project contains a large number of files, even with these shortcuts, the first pass might be onerous. For example, a Microsoft HTML help system where each topic has its own file can easily comprise several hundred files. For cases like this, you might want to try the alternative outlined here.
The idea is to have to speller automatically scan all of the files and save the unrecognized words. Then you spell check the unrecognized words and accept those that are not misspellings or questionable (typically, a large percentage of the suspects). This yields an Accept All list containing everything except the actual or suspected misspellings. Finally, you run the speller a second time to deal with the questionable words and errors that you did not previously accept. The advantage here is that you trade dealing with many short lists of suspects for dealing with one long list—one of MicroSpell's strengths. You also get a location-specific dictionary for future use. (A future version of the speller might have a wizard to help you deal with a large number of files, but for now, you'll have to follow the instructions below.) Here is the procedure step-by-step:
- Add all of the files you want to correct to the Document List.
- [Optional] If there are words on the Accept All list and they are unrelated to the current task, clear the Accept All list.
- Make sure the Spell|Auto Spell Check on File Open option is checked. Then give the Spell|Scan and Save Unknown Words ("Learn" Mode) command. You will be given an opportunity to set the destination where the unrecognized words will be saved. Select the Accept All list and press the Go button.
-
When the speller finishes, clear the main edit window (using the
toolbar button
 or
File|Zap), copy the Accept All list to the Clipboard and paste it
into the main edit window. Clear the Accept All list. (Pop-up menu
commands are handy for these tasks.)
or
File|Zap), copy the Accept All list to the Clipboard and paste it
into the main edit window. Clear the Accept All list. (Pop-up menu
commands are handy for these tasks.)
-
Use the
 button to spell check the main
edit window. In the Inbox, use the Accept All command on
suspects that are not questionable. It is not critical that you
accept everything that is not a misspelling right now; it is
important that you not accept anything that is a misspelling.
In other words, use the Accept All command on everything you
don't want to see again.
You can use the Allow Once
command for all of the misspellings or questionable words, or just
leave them in the Inbox. (Alternatively, you can correct suspects that are obvious
misspellings using
the Replace All command which automatically adds the correction
to MicroSpell's temporary "Replace All" list. When you recheck the documents,
these will be corrected automatically or semiautomatically.)
When you're finished, the Accept All list
will contain those words that the speller can safely ignore.
Press the <Esc> key to close the Inbox.
Then clear the main edit window using the
toolbar button or
File|Zap.
button to spell check the main
edit window. In the Inbox, use the Accept All command on
suspects that are not questionable. It is not critical that you
accept everything that is not a misspelling right now; it is
important that you not accept anything that is a misspelling.
In other words, use the Accept All command on everything you
don't want to see again.
You can use the Allow Once
command for all of the misspellings or questionable words, or just
leave them in the Inbox. (Alternatively, you can correct suspects that are obvious
misspellings using
the Replace All command which automatically adds the correction
to MicroSpell's temporary "Replace All" list. When you recheck the documents,
these will be corrected automatically or semiautomatically.)
When you're finished, the Accept All list
will contain those words that the speller can safely ignore.
Press the <Esc> key to close the Inbox.
Then clear the main edit window using the
toolbar button or
File|Zap.
- In the Document List dialog, give the Mark All Files Unchecked command on the pop-up menu.
-
Use the button to run MicroSpell
normally on all of the files and correct all of the errors. When you
have finished, we strongly suggest you copy and paste the Accept All
list into the location specific dictionary for these files so you can
spell check them efficiently in the future.
Note: If you find no misspellings or questionable words while spell checking the Accept All words, you might be tempted to skip the second spell check pass. Don't. You need the second pass to check for and correct repeated words.
Maximizing and Arranging Your Windows
If you need to temporarily view the Inbox, Outbox, or main edit window in full screen mode, remember the Windows shortcut of double-clicking the window title bar to maximize or restore the window size. This is particularly convenient for reviewing the Outbox auto-accepted items.
The easiest way to arrange your windows is to use the Window Menu layout commands. If you find one of the predefined layouts acceptable (note that the Inbox must be open to enable the layout commands), you'll probably want to enable the Automatically Apply Last Layout Command. On the other hand, if you'd rather set your own window sizes and positions, make sure this command is not enabled. MicroSpell saves the size and position when you close a window, so make the changes you prefer then immediately close the window to preserve them.
When Two Different Letters Look Identical
With certain Inbox fonts, you cannot distinguish "one" from lower case "el" or lower case "el" from upper case "i". Occasionally, you'll need to resolve this ambiguity for a particular suspect. Form the Inbox, double-click the suspect and use the Replace dialog Case Adjust command to reveal the identity of the character in question. The Spell Check dialog also has a Case Adjust button.
Use DSDs or LSDs to Save Work
When you check a file that you expect to recheck in the future, consider using a location-specific or document-specific dictionary to save suspects that are not misspellings. To decide which one, ask yourself: "Am I likely to recheck this file by itself, or as one of a group of related files residing in the same directory?" If the former, use a DSD, otherwise use an LSD.
Regardless of which dictionary you use, you'll probably want to copy all of your "Accept All" suspects and any remaining Inbox suspects there so they'll be recognized next time. While you can save words as you check and correct your document, it is probably easier to save everything bound for the DSD or LSD at once when you're finished. You can easily do this using one of the alternate Inbox close buttons. Alternatively, you could set the save destination on the Accept All button or use the Copy and Paste commands on the Dictionaries dialog pop-up menu to copy the Accept All list and paste it into the DSD or LSD.
The Spell Check dialog has a pair of Save buttons dedicated to the LSD and DSD.
Why is the Speller not Opening a DSD or LSD?
MicroSpell only uses DSDs and LSDs if they are enabled. You can control these options from the General Preferences dialog, "User Dictionaries" tab. See "Document-specific user dictionaries" Group for more information.
Another possibility is that you just typed some text into a new document or you used the File|Save As command to save a document. Because MicroSpell opens the DSD and LSD when it is opening a file, it has not yet had an opportunity to do so. A simple workaround is to save your document (if necessary), use the File|Zap command, then reopen it using the MRU list on the File menu.
Why Does the Speller Change the Font or Other Formatting During a Hotkey Check?
If you are using the Hotkey Spell Check function (or copying and pasting text) and you find that when
you return the corrected text to the source, your fonts or other formatting features have changed, make
sure you are not refusing rich text. This is controlled via the Text Formats and Modes dialog
accessible via the Options | Change Current Mode command. For more information see
Modes and Text Formats.
First Line of Inbox or Outbox is Obscured after Font Change
Occasionally when you change a font, the Inbox or Outbox redraws
so the first line is partially obscured by the sort header. This is a one-time
problem; it works fine the next time you open the box and thereafter. The workaround
is to close and reopen the box.
Why is the Speller not Coloring Skipped Text?
Refer to the discussion at Coloring Skipped Text.
How to Stop Text from 'Bouncing' During Coloring
Sometimes the text in the main window "bounces" (scrolls up and down rapidly) while the speller is coloring material that will not be checked. You can minimize this by using View|Size to Fit Whole Number of Lines.
A similar visual distraction occurs when the text being colored has an attribute (e.g. bold or italic) different from the uncolored text. In many instances the bold or italic characters take up more space than their normal equivalents, so there is an annoying horizontal displacement as the text is being colored. The solution is to use the same attribute for all text.
How to 'Allow Once' a Large Number of Suspects
By design, the Inbox Allow Once function operates on a
single instance of a suspect. If there are many occurrences of
the same suspect, it could be impractical to use this function
while the Inbox view is "First Only." Therefore, switch the view
to "All", select all of the instances and use the Allow Once
function.
Alternatively, you can use the Accept All command on the suspects, then remove them form the "Accept All" list. To do this, select the suspects, copy them to the Clipboard, and then give the Accept All command. In the Dictionaries dialog, enable the "Remove" checkbox, and use the right mouse button pop-up menu command Paste to remove the words from the "Accept All" list.
Refer to the Allow Once discussion for more information.
How to 'Replace' Many Suspects Efficiently
If you are fixing a large group of suspects most of which have the required correction as the first guess, double-clicking each of them can be quite a chore. Instead, fix the minority that require a guess other than the first one or the services of the Replace dialog. When you're finished, the remaining suspects can quickly be corrected by using the keyboard accelerator <1>: just select the first one and hold the <1> key down until all of the replacements are finished.
How to Skip Checking Parts of Your Document
Some documents contain material that you do not want the speller to check, either because it would find many "false alarm" suspects or because you have deliberately included something that the speller is designed to catch and correct. TeX, RTF, and HTML documents contain many commands and tags that you probably want the speller to ignore, and when operating in the corresponding mode, it will do just that.
If you want to skip a specific part of your document—a large table of numbers, a sample program, etc.—the predefined "skip blocks" won't help you. For these cases, a user defined skip block might be the answer, especially if you are working with TeX or HTML and don't mind having the speller check your comments. To do this, choose a pair of short (8 or fewer characters) sentinel strings that would never appear in your documents unless you put them there deliberately to switch spell checking on and off. The documentation you are currently reading uses %MSoff and %MSon to prevent checking and correcting the deliberate errors. (Yes, the first instance of "and" in the last sentence is never spell checked.) The first character of your sentinels should not be the same as the first character of any of the predefined skip blocks (or commands or comments) for the current mode. For example, our sentinels would not be appropriate for TeX documents because TeX uses "%" to mark the beginning of a comment. The speller will warn you if there's a potential problem; choose another sentinel or the speller might check more or less than you expect.
When you have chosen your sentinels, enter them in the property page appropriate for the document you are checking. For HTML, use Options|HTML Mode Preferences|Scan Options|User Defined Block Skip and fill in one pair of edit boxes. Don't forget to click the check box to enable your skip block. If you are working with TeX or HTML, you can prevent your sentinels from appearing in the text the reader sees by placing them inside of a comment. For this to work, you'll have to disable the Ignore and Color Comments option that appears on the same property page you just edited (otherwise, the speller would never see your sentinels).
Finally, remember that the simplest way to skip material is to select what you want the speller to check. This is most practical for skipping something at the beginning or end of the document.
Why is the Speller Not Checking My Document?
First, check the status bar. If your document was checked and there were no errors, the Inbox (or Spell Check dialog) will not be opened but there will be a message on the status bar. Also, check the progress meter. If it indicates that (nearly) everything has been skipped, check whether there is a selection that is causing the speller to ignore all but a small part of the document. If this does not resolve the problem, the speller's block skipping functions might be malfunctioning either because of a problem in the document or the speller. Check the coloring of the text for clues.
Why Do I Get Fewer Suspects When I Close the Inbox and Recheck?
If you're checking a document and you have to close the Inbox to do some editing, you might be puzzled to find that when you recheck the document, the Inbox is missing some of the suspects that were there when you closed it. This happens because MicroSpell gains information as you work in the Inbox that enables it to recognize that certain suspects are correct. For example, if you use the Accept All command on a suspect that is all lower case, and the same suspect appears capitalized, it will be a "known" word and will not reappear if you recheck the document.
Another way this can happen is when you use the Accept All command on a suspect composed of multiple fragments (e.g. www.microspell.com) and you have enabled "fragment save" which is off by default (see below). In our example, in addition to saving "www.microspell.com" on the Accept All list, the speller would also save each of the fragments separately: "www", "microspell", and "com". This means the if "com" appeared in the Inbox by itself (perhaps because you mistyped "come"), it would be colored as a known word, and if you were to recheck the document before dealing with it, it would not reappear.
Having the speller save word fragments as described above makes the Inbox a bit "smarter". However, as noted, there is a slight risk of your not seeing a genuine misspelling. If, despite this, you would like to enable this feature, you can edit the "WantFragSave" registry key. Look for: HKEY_CURRENT_USER\Software\Trigram Systems\MicroSpell\InBox\WantFragSave and set the value to 1. (All standard warnings about editing the registry apply: if you do not feel confident doing this, get some help.)
There are two other ways to deal with this potential problem. Whenever you are about the close the Inbox before you have finished working, give an Accept All - Newly Recognized command, then check the highlighted group of suspects in the Outbox for problems—these are the suspects that will not reappear when you reopen the Inbox. Alternatively, instead of closing the Inbox to edit your text immediately, you might prefer to set a bookmark so you can return to and edit the text later.
Sometimes you might experience the opposite effect: you check a document and notice suspects that you don't remember seeing the last time you checked the same document. Assuming you've closed MicroSpell between the two instances, and assuming you haven't introduced the suspects by editing the document, then it is likely that the "new" suspects were on the temporary Accept All list when you first checked the document.
Why Does the Speller Work Slowly With Large Files?
If you are checking a large file (one megabyte greater) and MicroSpell takes a very long time to respond to some commands such as showing words highlighted in context in the main edit window when you click the context column in the Inbox, then you probably have an old version of the Windows rich edit control DLL on your system. We have found that DLLs dated 7/11/95 (and presumably earlier, for Windows 95) have this problem. DLLs dated 5/11/98 (and presumably later) work as expected. We haven't tested any DLLs bearing other dates. To find your DLLs, look in \Windows\System for files matching Riched*.dll.
If you have this problem, you will probably have to download a Windows update from Microsoft or copy the DLLs from a machine that has a later version. You can try a search at Microsoft's web site (www.microsoft.com) for the words "Windows" and "service" and "pack". Search the support area if you have this option. (See the following section for more ideas.)
Why does the Dictionary View/Edit Dialog Work Slowly or Fail to Edit Very Long Word Lists?
If you try to edit a very long word list (e.g. more than 250,000
words) in the Dictionary View/Edit dialog, you might encounter
one or more of these problems: your machine takes a very long time
to respond (sometimes incorrectly) to edit commands, the last word
visible in the edit box is not the last word on the list, you
receive "Out of Memory" error messages. These problems arise from
limitations in version 1 of Microsoft's "rich edit" control which we use to edit
the word list. Version 2 of the rich edit control does not appear to have
the same limitations. If your system has it available, MicroSpell will automatically
use it instead of version 1, so you should not encounter these problems. You can
determine whether your system has the version 2 DLL by searching for RICHED20.DLL in
the Windows directories.
The best way to solve these problems is to install version 2 of the rich edit control. Unfortunately, Microsoft prohibits other software vendors from distributing Windows components, and the rich edit control in particular, so we cannot give you an updated version. Windows 98 and recent versions of NT ship with RICHED20.DLL, the version 2 rich edit DLL that you need. If you have another computer, you might be able to find this file on it. Another possibility is to install the latest version of Internet Explorer. If you don't want to do this, try installing the Word 97 viewer available at http://www.microsoft.com/Office/000/viewers.htm. (See the previous section for more rich edit control information.)
If you are reading this because you received a warning message in the View/Edit dialog, you are probably hoping for a more immediate solution. First, try pressing <Ctrl-End> to scroll to the end of the list. If this seems to work (i.e. you see the last word on the list), you can probably continue to edit your list without problems. If this doesn't work, then you probably cannot edit the list; you should exit from the dialog using Cancel, not Save. If you were just trying to build a new dictionary or augment an existing one by importing a word list, you can probably still do this. Open the dictionary you want to build or augment in the View/Edit dialog. Do not type anything in the edit box, do not attempt to select words or even scroll around. Instead, give the command(s) to augment the current dictionary: i.e., Add another dictionary or import a word list. If you don't receive any error messages, press Save. Update your rich edit control as soon as possible.
The same issues discussed above apply to MicroSpell's main window because it is also based on the rich edit control. Unfortunately, even if your system has version 2, MicroSpell will not currently use it for the main window. Fortunately, this will probably not affect you because your text file would have to be at least several megabytes long before you experience difficulties. The number of lines seems to be as important as the length: we've successfully checked an 8Mb RTF file. If you're having problems with significantly smaller files, see the previous section.
How Do I Abandon a Spell Check and Restart Fresh?
If the Inbox or Spell Check dialog is still open, the easiest way is to open the Outbox, if necessary, highlight everything (by pressing <Ctrl-A>), and then press the Undo button.
If you have closed the Inbox but not yet saved your document, and you
want to lose all of the changes you made, use the zap button on the main edit window toolbar to remove
the document then use either the File
List dialog or the "most recently used files" list on the
File menu to reopen the document.
If you have already saved your document and you want to revert to the original, you'll have to rename the backup file, assuming you have backups enabled. If the file is still open in MicroSpell, another possibility is to use the Edit|Undo command on the main edit window repeatedly until it becomes grayed out.
Before you recheck your document, decide whether you want to clear any or all of the speller's temporary dictionary lists. If you clear the "Reptd. Words" list, you'll have to re-accept any repeated words that you previously accepted. There is usually no reason to clear the "Replace All" list because the suspects that it affects are easy to find in either the Inbox or Outbox; if you want to handle a few of them differently, this is easy to do.
If you clear the Accept All list, you'll have to find and re-accept all of the original accepted words that you still want to accept. If you do not clear the list, you will not see any of these words in the Outbox because they will be known words when you check the document again. If neither of these alternatives is satisfactory and you want to see your original accepted words in either the Inbox or the Outbox, copy the contents of the Accept All list to the Clipboard (using the Copy command on the pop-up menu in the Dictionaries dialog), then clear the list. After you recheck the document, Paste the words back into the Accept All list. This will cause the Inbox to recolor all of these suspects as known words, and you can use the Inbox pop-up menu command Accept All - Newly Recognized to move them to the Outbox where you can scrutinize the whole group.
How Do I Enable the 'Learn Remaining Words' Dialog During Hotkey Spell Checking?
By default, MicroSpell does not show the Learn Remaining Words dialog
during hotkey spell checking.
If you would like to enable
this feature, you can add the "SaveDlgHot" key to the registry (if necessary) and
set the value to 1. The appropriate place is:
HKEY_CURRENT_USER\Software\Trigram Systems\MicroSpell\InBox.
If you want to disable this, set the
value to 0. (All standard warnings about editing the registry apply:
if you do not feel confident doing this, get some help.)
How Do I See What Changes Were Made in My Document If It Is No Longer Open?
Use the Main Window View|Status Message Log command.
Installing and Using the MicroSpell Tray Icon
An installer option enables you to place a MicroSpell icon (a red check mark) in the taskbar system tray
so the speller remains readily available but without an intrusive taskbar button. This is a recommended default
so you probably already have it installed. Here we tell you how to use it, how to remove it, and how to
add it if you originally chose not to install it.
You can
display the speller anytime by clicking the tray icon. If you double-click the tray icon, the
speller will check the contents of the Clipboard if it contains text. If you press <Alt> while
![]() double-clicking, the speller will perform a web lookup of the word on the Clipboard
using the default lookup destination. You can also right-click on the tray icon to see a menu of commands.
Most of these duplicate the functions just described, but let you decide, for example, whether the speller will
do a normal spell check or display the Lookup dialog. Before this menu is displayed, the word
on the Clipboard (if any) is spell checked and a menu option inserted that either verifies that the
spelling is OK or leads to a submenu of suggested alternatives.
double-clicking, the speller will perform a web lookup of the word on the Clipboard
using the default lookup destination. You can also right-click on the tray icon to see a menu of commands.
Most of these duplicate the functions just described, but let you decide, for example, whether the speller will
do a normal spell check or display the Lookup dialog. Before this menu is displayed, the word
on the Clipboard (if any) is spell checked and a menu option inserted that either verifies that the
spelling is OK or leads to a submenu of suggested alternatives.
The Shut Down Speller command will close the speller and remove the icon from the system tray (this is the only way to temporarily remove the tray icon). While you are running the speller from the system tray, the normal speller close commands (e.g. the "x" in the upper right corer of the main window) hide the speller window(s), but do not remove the icon from the system tray. The speller remains available for hotkey spell checking and other functions. The tray icon feature is controlled by a MicroSpell shortcut in the StartUp folder: you can remove it to permanently remove the tray icon or add a new shortcut to enable it if you did not have the installer add one.
To find the Startup folder right-click on the Windows Start button and select Open. Find the Programs folder and double-click. Find the StartUp folder and double click to open it. You can then either delete the MicroSpell shortcut or create a new one by right-clicking and using the New | Shortcut command, then browsing to the MicroSpell program file (ms32.exe). Once you've created the shortcut, right-click on it, select Properties and click on Shortcut. Add a space after ms32.exe in the Target box, and type "-b" (without the quotes). Press OK to save your changes.
Installing and Using MicroSpell With NT Emacs
If you are using Emacs on a Windows 95/98/NT machine, you can arrange for MicroSpell to work from within Emacs. If you are currently using Ispell, there is no need to stop using it: MicroSpell will coexist peacefully with it and you can choose the most appropriate tool each time. You can ignore the installation instructions presented here and still use MicroSpell within Emacs via its "hotkey" spell checking function. However, if you do not normally leave MicroSpell running, you might find it more convenient to "install" it so it becomes available on the Emacs edit menu.
Installing MicroSpell for Emacs
First, install MicroSpell as you normally would, and verify that it works, perhaps by running the demo. After installation, look in the speller's "DATA" directory (by default, C:\Program Files\MicroSpell\DATA) for a file named muspell.el. This file contains the elisp source that will place MicroSpell on the Emacs edit menu and invoke it when you select the appropriate option. You need to ensure that the code in muspell.el gets loaded when Emacs starts. An easy to do is to add this line to your _emacs (.emacs) file:
(load "C:/Program Files/MicroSpell/DATA/muspell")
Note that if you haven't installed the speller in the standard place, you'll have to edit the path shown; also, note that you don't have to include the .el extension on muspell.
(If you prefer, you can copy the entire contents of the muspell.el file to your _emacs file instead of adding the "load" command.) Before you start Emacs to test the speller, check the definition of the variable "muspell-path" (near the top of the file) to be sure it matches the directory where you have installed MicroSpell. If you have to edit the path, use the current definition as an example and make sure the new one ends with "\\".
If you want MicroSpell to use your Ispell personal dictionary, start MicroSpell and open the Dictionaries dialog using the File menu. Press the Add Dict. button, then browse to your Ispell dictionary and "Open" it. This will place the dictionary on MicroSpell's dictionary list; if its icon shows a closed book, double-click it to open it. You can also have MicroSpell import Ispell dictionary word lists. For more information, see Importing an Ispell Word List.
When you start Emacs, MicroSpell should appear on the "Edit" menu. There are five commands that invoke the speller:
- Check File
- This command saves unsaved buffers to their associated files, then
invokes MicroSpell on the current buffer's file. When you exit from MicroSpell, the buffer's
file is reloaded so any changes are reflected in the buffer text. If you plan to use document
or location-specific dictionaries (LSDs/DSDs), this command is preferable to the Check Buffer
command.
Note that MicroSpell will allow you to check TeX documents that are included by the current document. If you do this, keep in mind that if any of these other files are associated with Emacs buffers, those buffers will not be reloaded automatically. It is probably best not to take advantage of this feature while running from within Emacs. (This feature is disabled by default when you check files from Emacs.)
- Check Buffer
- This command writes the current buffer to a temporary file, then invokes MicroSpell on that file. When you exit from MicroSpell, the contents of the file replace the contents of the buffer. Use this command when you want to check the contents of a buffer that is not associated with a file. If you plan to use document or location-specific dictionaries (LSDs/DSDs), the Check File command is preferable.
- Check Region
- This command writes the text between point and mark to a temporary file, then invokes MicroSpell on that file. When you exit from the speller, the contents of the file replace the contents of the region.
- Check Word
- This command passes the word beneath or before the cursor to MicroSpell via the Windows Clipboard. If the word is correct, MicroSpell will confirm it by briefly displaying a self-closing dialog. If the word is unrecognized, MicroSpell displays its Lookup dialog which shows similar words, lets you query the dictionary, lets you look up the word via the Internet, lets you save the word to a user dictionary, and lets you replace the word with another. When MicroSpell returns, your replacement appears in place of the original word.
- Complete Word
- This command is similar to Check Word except that it invokes the Lookup dialog with the wildcard query "<word>*" so that all entries in the speller's dictionary that begin with the <word> you asked to complete will be displayed automatically. You can select any of them to replace <word>.
If MicroSpell does not start up when you give one of these commands, be sure the "muspell-path" variable is defined correctly (see above). If Emacs appears to "hang" after you exit from MicroSpell, close any browsers that you might have opened via the Web Lookup function.
Installing and Using MicroSpell With Epsilon
If you are using the Epsilon programmer's editor on a Windows 95/98/NT machine, you can arrange for MicroSpell to work from within Epsilon. You can ignore the installation instructions presented here and still use MicroSpell within Epsilon via its "hotkey" spell checking function. However, if you do not normally leave MicroSpell running, or if you want to use the speller commands discussed below, you'll have to "install" it for Epsilon.
Installing MicroSpell for Epsilon
First, install MicroSpell normally (using ms-inst.exe), if you haven't already done so. Verify that it works, perhaps by running the demo.
After installation, look in the speller's "DATA" directory (by default, C:\Program Files\MicroSpell\DATA) for a file named spell.e. This file contains the eel source code that will add MicroSpell's speller commands to Epsilon. Start Epsilon and open spell.e. Issue the Epsilon "compile-buffer" command. (You can do this by typing Alt-X followed by compile-buffer). Issue the Epsilon "write-state" command to update your state file. The speller commands are now installed; you don't have to repeat these steps until you install a new version of Epsilon.
When you start Epsilon, MicroSpell's speller commands should be available if you have completed the installation steps given above. You can issue any of these commands by typing A-X followed by the command name. Two of them are already bound to keys; you'll probably want to bind any others that you use frequently. If you want to check a selection or all of the text in a buffer, the spell command will automatically invoke the most appropriate command so you needn't specify it yourself. There are seven commands that invoke the speller:
- spell-file
- This command saves the current buffer to its associated file, then invokes MicroSpell on the file. When you exit from MicroSpell, the file is reloaded so any changes are reflected in the buffer text. If you plan to use document or location-specific dictionaries (LSDs/DSDs), this command is preferable to the spell-buffer command. If you give a numeric argument, all unsaved buffers are saved before the speller is invoked. This would be appropriate if you are checking a TeX or HTML document that "includes" or link to other documents, and you plan to spell check those too. (The ability to check linked files is disabled by default when you check files from inside of Epsilon to make it harder to accidentally check and modify an unsaved file.)
- spell-buffer
- This command writes the current buffer to a temporary file, then invokes MicroSpell on that file. When you exit from MicroSpell, the contents of the file replace the contents of the buffer. Use this command when you want to check a buffer that is not associated with a file. If there is a file associated with the buffer, this command runs spell-file instead. If you don't want the text to be saved to a file, select everything and run spell-region.
- spell-region
- This command checks the text between point and mark. The text is passed to and returned from MicroSpell via the Windows Clipboard.
- spell-word
- This command passes the word at or before point to MicroSpell via the Windows Clipboard. If the word is correct, MicroSpell will confirm it by briefly displaying a self-closing dialog. If the word is unrecognized, MicroSpell displays its Lookup dialog which shows similar words, lets you query the dictionary, lets you look up the word via the Internet, lets you save the word to a user dictionary, and lets you replace the word with another. When MicroSpell returns, your replacement appears in place of the original word. This command is bound to A-$.
- spell-complete-word
- This command is similar to spell-word except that it invokes the Lookup dialog with the wildcard query "<word>*" so that all entries in the speller's dictionary that begin with the <word> you asked to complete will be displayed automatically. You can select any of them to replace <word>. This command is bound to C-X &.
- spell-define-word
- This command passes the word beneath or before the cursor to MicroSpell via the Windows Clipboard. MicroSpell displays its Web Lookup dialog with your word entered as the search word. Web Lookup enables you to obtain definitions, spellings, synonyms, etc. via the Internet.
- spell
- If there is highlighted text, this command runs the spell-region command. Otherwise, it runs the spell-file command if there is a file associated with the buffer, or spell-buffer if not.
Installing/Uninstalling MicroSpell
If you are installing a new version of MicroSpell and there is already a Windows version (vers. 9 or higher) installed, you can install the new version over the old instead of uninstalling the old one first. The new files will replace the old ones, except for the dictionary files, and the hotkey scripts which are not replaced. None of your customizations that are held within the registry will be modified unless the new version requires a change. This means that most, if not all, changes that you made in the old version will carry over to the new one. If you want to ensure that the new version of any existing file is installed, delete or rename the old one before you run the installer.
If you don't want to keep your old settings, then you should uninstall the old version of MicroSpell before installing the new one. Please note that unless you choose "Custom Uninstall," the uninstall program will remove all of the files that the install program installed. This means that if you have modified any of the dictionaries included with MicroSpell, you will lose your changes. If this is not acceptable, copy the ones you want to keep to another directory (you'll find them in "C:\Program Files\MicroSpell\Dict" unless you changed the default installation directory). Alternatively, you can choose a Custom Uninstall and de-select the dictionaries and any other files you want to keep on the "Select Files You Want to Remove" dialog. If you take this approach, be sure to also de-select the MicroSpell "program files" directory (and any others whose removal would take away files you want to keep) in the "Select Directories to Remove" dialog.
If you are installing a new version over the old (without uninstalling) and you have not modified any of MicroSpell's main dictionaries (the .LEX files), you might want to delete them before you install the new version. This will allow the install program to add the most recent versions of these files. (This is a good reason not to modify MicroSpell's main dictionaries, but create your own instead (e.g. mymain.lex) to augment them.)
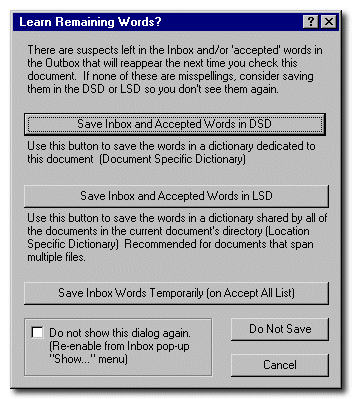
"Learn Remaining Words" Dialog (Obsolete)
 Dealing with Suspects
That Aren't Misspellings: As described elsewhere,
you can easily save the words remaining in the Inbox
by pressing one
of the alternate Inbox "Done" buttons. Most users will probably find this
preferable to dealing with the dialog shown here; if you are among
them, you can skip the rest of this section.
Dealing with Suspects
That Aren't Misspellings: As described elsewhere,
you can easily save the words remaining in the Inbox
by pressing one
of the alternate Inbox "Done" buttons. Most users will probably find this
preferable to dealing with the dialog shown here; if you are among
them, you can skip the rest of this section.
Note: this dialog is off by default; to see it, you must enable it using the Inbox right mouse button pop-up menu Show | Learn Remaining Words Dialog When Done command.
If the Inbox or Outbox contains words that will reappear the next time you check this document you will see the dialog shown here after you press the "Done" button. This dialog offers you a convenient way to ensure that you won't see the same suspects again by letting you save them in a dictionary.
The text in the dialog box describes the two alternatives, and MicroSpell attempts to set the default button to the most appropriate one. Click one of the save buttons to proceed, or Cancel if you want to go back to the Inbox. If you click any button (except Cancel), the speller carries out that command and then continues with the Inbox "Done" command.
You can read more about using DSDs and LSDs here. Tip: you might find it helpful to move this dialog so that the button you use most frequently is positioned over or near the Inbox Done button so you can press both quickly. This dialog is not shown during hotkey spell checks; if you want to change this behavior, see this topic.
If you mistakenly modify a dictionary, see Recovering From Unintended Changes to User Dictionaries.